Showing posts with label Fox Hollow. Show all posts

Thursday, October 24, 2019

Peace on Earth Card by Samantha Mann


Peace on Earth Card by Samantha Mann | Fox Hollow Stamp Set by  Newton's Nook Designs #newtonsnook #handmade

Peace on Earth!

This peaceful scene by Samantha is perfect for sharing some sun on a cold winter day!

She started out by creating a background with a sparkly snowy sky using our Petite Snow Stencil over the blue sky with a yellow glow.  She used white embossing paste and glitter embossing powder for the snow! Once it was dry, she heat embossed the glitter powder to create a sparkly effect.

For the scene she used the cute little fox from our Fox Hollow Stamp Set and colored him in shades of orange, adding a blue scarf and some white gel pen details. She added in trees, also from the Fox Hollow Stamp Set, and snowy hills using our Land Borders Die Set. On the fox  and the hills and trees she added yellow glows so show the warm sun rising over the hill. Isn't it so darling how the fox is soaking up a the warm sun? The images were fussy cut to add onto the card but if you don't like fussy cutting, this set does have a coordinating die set so you could use that instead.

Peace on Earth Card by Samantha Mann | Fox Hollow Stamp Set by  Newton's Nook Designs #newtonsnook #handmade
This project by Sam will give you a warm glow today! To  say hello to her and see more of her awesome creations you can visit Sam over on her blog, Sam's Scrap Candy!

Tuesday, September 17, 2019

Newton's Nook Designs & Therm O Web Inspiration Week - Day 2 with Zsofia & Holly


This week Newton's Nook Designs and Therm O Web are partnering for a fabulous inspiration week! All week long both design teams will be sharing ways to add fun foils and more to your cards using Therm O Web products with Newton's Nook Designs stamps! There are prizes too! Read all the way to the end of this post to find out how you can win! 

Today we are featuring projects by Zsofia and Holly! 
First, we have several fun projects created by Zsofia: 
Newton's Nook Designs & Therm O Web Inspiration Week - Halloween card by Zsofia Molnar | Newton's Boo-tiful Night Stamp Set and Tree Rings Stencil by Newton's Nook Designs | Flock Transfer Sheets by Therm O Web #newtonsnook #thermoweb
On her frist card Zsofia features that cute kitty peeking out of the pumpkin from our Newton's Boo-tiful Night Stamp Set. She colored the kitty and pumpkins in traditional Halloween colors and cut the image out using the coordinating Newton's Boo-tiful Night Die Set. For the background she created a flocked texture using our Tree Rings Stencil. She used the stencil with Deco Foil Transfer Gel from Them O Web. Once the gel was dry, she added the flock using Deco Foil Flock Transfer Sheets in White Latte from Therm O Web with a laminator. The sentiment on the banner was stamped from our Newton's Pumpkin Patch Stamp Set.

Newton's Nook Designs & Therm O Web Inspiration Week - Halloween card by Zsofia Molnar | Newton's Boo-tiful Night Stamp Set and Flying Bats Stencil by Newton's Nook Designs | Flock Transfer Sheets by Therm O Web #newtonsnook #thermoweb
On her second card, Zsofia used the Newton's Boo-tiful Stamp Set again, this time choosing the image of the kitty on the broom. She colored the kitty image and fussy cut it out to add to her card.  For the sky, she used our Flying Bats Stencil, again with the Deco Foil Transfer Gel from Therm O Web This time she used the Deco Foil Flock Transfer Sheets in Black Velvet.  She used blue and purple distress ink to created the background sky. She also used our Frameworks Die Set for the postage edge frame and our Frames & Flags Die Set for the banner that holds the sentiment. Such a fun Halloween sky! 
Newton's Nook Designs & Therm O Web Inspiration Week - Christmas Sloth card by Zsofia Molnar | Slothy Christmas Stamp Set, Holiday Greetings and Pines& Holly Die Sets by Newton's Nook Designs | Foil-mates and Foil by Therm O Web #newtonsnook #thermoweb
 For this card, Zsofia switched to the Christmas theme and she featured the sloth from our Slothy Christmas Stamp Set. She used the coordinating Slothy Christmas Die Set to cut the image out. She paired this cute image with some sparkle using Therm O Web products. She used the  Gina K. Designs Fancy Foils 6x8 in Passionate Pink  along with the Gina K. Designs Foil-Mates Backgrounds - Stars & Stripes to create that lovely striped background. She also used our Frames & Flags Die Set for the scalloped die cut edge and the rounded rectangle cut from vellum. She finished it off with some pine boughs using our Pines & Holly Die Set and a glitter sentiment, die cut using our Holiday Greetings Die Set.

Newton's Nook Designs & Therm O Web Inspiration Week - Winter Fox card by Zsofia Molnar | Fox Hollow Stamp Set and Petite Snow Stencil by Newton's Nook Designs | Flock Transfer Sheets and Glitter Glitz Gel by Therm O Web #newtonsnook #thermoweb
 Zsofia was having so much fun creating, she decided to create a winter card too! This lovely card features the cute fox friends from our Fox Hollow Stamp Set.  She colored the foxes and several trees using soft wintery colors and cut them out using the coordinating Fox Hollow Die Set. To create a scene for them she used our Land Borders Die Set along with the Deco Foil Flock Transfer Sheets - White Latte from Therm O Web to create a fuzzy white hill. For the snowy background she paired our Petite Snow Stencil with the Gina K. Designs Glitz Glitter Gel  in White  from Therm O Web. So pretty! She also used our Frames & Flags Die Set for the scalloped edge on the frame.

Visit Zsofia's blog to see more details!
 Next, we have a Halloween card by Holly:

Newton's Nook Designs & Therm O Web Inspiration Week - Halloween card by Holly Endress | Newton's Boo-tiful Night Stamp Set, Starfield and Clouds Stencils by Newton's Nook Designs | Deco Foil Metallix Gel and Glitz Glitter Gel by Therm O Web #newtonsnook #thermoweb

To create this adorable Hallowee scene, Holly used those cute kitties playing in the pumpkin patch from our Newton's Boo-tiful Night Stamp Set. She colored them so they all matched with similar brown and orange markings. For her card she fussy cut them out by hand but you could also use the coordinating Newton's Boo-tiful Night Die Set. To create her scene she used our Clouds Stencil to create layers of purple clouds in the background. Then she added stars over the top using Gina K. Designs Glitz Glitter Gel in White from Therm O Web along with our Cascading Stars Stencil. Along the bottom of the card she created a fun textured ground using Deco Foil Metallix Gel in Black Ice from Therm O Web. She finished her card out with the sentiments from the Newton's Boo-tiful Night Stamp Set over the top. She also used the Memory Tape Runner XL from Therm O Web to adhere it all together.

Visit Holly's blog: Hollybeary Creations to see more today!

For a chance to win, enter using the rafflecopter link at the end of this blog post today!
There are also more amazing projects over on the Therm O Web blog so pop over there for more inspiration! Don't forget to enter to win a prize from either Therm O Web or Newton's Nook below! 
a Rafflecopter giveaway


Wednesday, November 7, 2018

Newton's Nook Designs & Therm O Web Inspiration Week - Day 3 with Holly & Nakaba

Newton's Nook Designs and Therm O Web Inspiration Week #newtonsnook #thermoweb

This week Newton's Nook Designs and Therm O Web are partnering for a fabulous inspiration week! All week long both design teams will be sharing ways to add fun foils and more to your cards using Therm O Web products with Newton's Nook Designs stamps! There are prizes too! Read all the way to the end of this post to find out how you can win! 

Today we are featuring projects by Holly and Naki! 

First we two fun foiled cards by Holly: 
Newton's Nook Designs & Therm O Web Inspiration Week | Cat and Coffee Card by Holly Endress | Newton Loves Coffee Stamp Set by Newton's Nook Designs and foils by Therm O Web #newtonsnook #thermoweb
For her first card, Holly featured the cute kitty and coffee press from our Newton Loves Coffee Stamp Set. She colored the image with copics and added a few white gel pen details. Then she cut it out using the coordinating Newton Loves Coffee Die Set. For the Fun foiled background she used Brutus Monroe Designer Toner Sheets (Coffee Rings) with Amber Watercolor Deco Foil from Them O Web. She also added the sentiment from the Newton Loves Coffee Stamp Set, embossed in white on a banner that was cut out using our Frames & Flags Die Set. 
Newton's Nook Designs & Therm O Web Inspiration Week | Starry Night camping Card by Holly Endress | Cozy Campers Stamp Set by Newton's Nook Designs and foils by Therm O Web #newtonsnook #thermoweb

For her second card, Holly created a lovely night camping scene! She used those cute campers from our Cozy Campers Stamp Set, coloring them with copics and adding fun details with a white gel pen. She then cut out the campers with the coordinating Cozy Campers Die Set and added them onto her night scene. To set the scene she created a fun starry background using For the Fun foiled background she used Designer Toner Sheets (Starry Night) along with Silver Stars Deco Foil from Them O Web. She layered this over a dark distress inked background and also added a hill using our Land Borders Die Set. She also cut out the rounded rectangle and scallop edged rectangle using our Frames & Flags Die Set. 


Visit Holly's blog: Holly Beary Creations to see more and leave a comment for another chance to win!


 Next, we have two adorable foiled cards by Naki:
Newton's Nook Designs & Therm O Web Inspiration Week | Winter Forest Fox Card by Naki Rager | Fox Hollow Stamp Set and Forest Scene Builder Die Set by Newton's Nook Designs and foils by Therm O Web #newtonsnook #thermoweb
For her first card Naki created an adorable winter scene featuring that sweet pair of foxy friends from our Fox Hollow Stamp Set. She colored the foxes with soft watercolors and cut them out with the coordinating Fox Hollow Die Set to add them to her card. For her card she created a winter scene by adding birch and pine trees in white that were cut out using our Forest Scene Builder Die Set. To add the sparkly dots she used Brutus Monroe Designer Toner Sheets (Distress Circles) along with Silver Deco Foil from Them O Web. She also created subtle sparkly hills using our Land Borders Die Set and adding on Iridescent Deco Foil from Therm O Web. 
Newton's Nook Designs & Therm O Web Inspiration Week | Christmas Ornament Card by Naki Rager | Ornamental Wishe Stamp Set and Ornament Shaker Die Set by Newton's Nook Designs and foils by Therm O Web #newtonsnook #thermoweb
For her second card, Naki created a gorgeous red foiled background using Gina K Designs Foil Mates (Holiday Flora) and Red Deco Foil from Therm O Web. Then she layered a fun teal ornament shape on top that was cut out using our Ornamental Shaker Die Set. She added on a gold glittery top and embossed the sentiment from our Ornamental Wishes Stamp Set in gold too! So sparkly and perfect for the holidays! 

Visit Naki's blog: Notes from Naki to see more and leave a comment for another chance to win!


There are also more amazing projects today over on the Therm O Web blog so pop over there for more inspiration!

Would you like to win a Prize pack including a $25 store credit to Therm O Web AND a $25 store credit to Newton’s Nook Designs? 


Here's how to win: 
Here's how to win: Leave comments on the NND & Design Team blog posts using therm-o-web products all week (November 5-9) to enter. One winner will be randomly chosen from blog posts throughout the week so the more posts you leave comments on the better your chances are of winning! You have until Friday November 9th at midnight CST to comment. The winner will be announced on the NND blog post on Monday, November 12th.

Want another chance to win? Therm O Web will also be giving away a prize pack! Visit the Therm O Web blog each day this week for more inspiration and leave comments there for another chance to win!


Friday, November 2, 2018

Peace on Earth Card by Amanda Bodine

Peace on Earth Card by Amanda Bodine | Fox Hollow Stamp Set and Forest Scene Builder Die Set by Newton's Nook Designs #newtonsnook #handmade

Peace on Earth! 

Today we are sharing this peaceful card featuring a duo of lovely foxes by Amanda! She used that cute snuggly couple from our Fox Hollow Stamp Set, coloring them with copic markers and adding sweet little hats to heir heads to keep them warm! She cut out the images using the coordinating Fox Hollow Die Set. For her card base, she inked a lovely light to dark ombré blue background with distress inks. She stamped some snowflakes from the Fox Hollow Stamp Set, embossing them in white. Then she added on the birch trees, leaves and cardinal using our new Forest Scene Builder Die Set.  What a gorgeous winter scene!

Thanks for the lovely woodsy inspiration today, Amanda! To see more of her beautiful coloring and projects, visit Amanda over at her blog,  RutabagaPie Designs!


Friday, August 24, 2018

Interactive Halloween Card by Ellen Haxelmans

Today we have another fun interactive project to share by Ellen! Each month she is sharing an interactive project to inspire you! 

Today is she's sharing a Halloween Slider card where the ghost moves across the scene card when you pull out the slider tab!
Interactive Halloween Card by Ellen Haxelmans | Boo Hoo, Fox Hollow and Snow Globe Scenes Stamp Sets and Land Borders Die Set by Newton's Nook Designs #newtonsnook #handmade
Here are step-by-step instructions from Ellen on how to make a card like this:

Interactive Halloween Card by Ellen Haxelmans | Boo Hoo, Fox Hollow and Snow Globe Scenes Stamp Sets and Land Borders Die Set by Newton's Nook Designs #newtonsnook #handmade
  1.  Color all images of your choice. For this card I used Copic Markers and colored images from several sets. The ghost is from the Boo Hoo Stamp Set, the trees are from the Fox Hollow Stamp Set, the leaves and acorn are from the Autumn Newton Stamp Set and the row of houses is from the Snow Globe Scenes Stamp Set. All of them were cut out using the coordinating die sets. To make the ghost a little bit more cute I did glue a few “eye” enamel dots on his face.
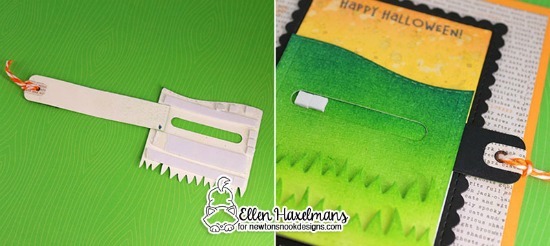
  2. (Photo on Right) cut out all the scene objects. You need a sky, a hill and a grass shape using the Land Borders Die Set. These shapes where colored then with distress ink. I also added the Happy Halloween sentiment on the top using the Halloween Trio Stamp Set. On the hill you cut out a small rectangular shape. Next to that you need a little bigger rectangular shape as slider tag. I used one of the toppers from the Fancy Edges Tag Die Set, so I could put twine through the slider tag.

    Interactive Halloween Card by Ellen Haxelmans | Boo Hoo, Fox Hollow and Snow Globe Scenes Stamp Sets and Land Borders Die Set by Newton's Nook Designs #newtonsnook #handmade
  3. (Photo on Left) Cover the backside with pop dots and self adhesive foam. Make sure the slider tag fits in the spot with the opening. Close only one side on the left or right, so you have a stop point when you push in the tag.
  4. (Photo on Right) Put the scene together. Afterward you need to place the tag in the correct furthest in position. Put foam adhesive on the opening on top of the tag and place your ghost on top of the foam. I mounted the whole scene on a scallop edge black panel that was cut out using the Framework Die Set. Then I mounted it all to the card base with some spooky word patterned paper!
Here is how the finished card looks before you pull the slider: 
The ghost is hiding behind the trees!
Interactive Halloween Card by Ellen Haxelmans | Boo Hoo, Fox Hollow and Snow Globe Scenes Stamp Sets and Land Borders Die Set by Newton's Nook Designs #newtonsnook #handmade
When the slider is pulled the ghost moves to be revealed between the trees:
Interactive Halloween Card by Ellen Haxelmans | Boo Hoo, Fox Hollow and Snow Globe Scenes Stamp Sets and Land Borders Die Set by Newton's Nook Designs #newtonsnook #handmade

    What a fun way to send send a cute and spooky interactive Halloween Card!

    If you love this project by Ellen you can visit her over at her blog Crafty Ellen to see more of her beautiful creations!

    Thursday, June 14, 2018

    Interactive Hello Baby Card by Ellen Haxelmans


    Today we have another fun interactive project to share by Ellen! Each month she is sharing an interactive project to inspire you! 

    Today is she's sharing a fun window card with a hidden message!

    Here are step-by-step instructions from Ellen on how to make a card like this:
    Interactive Hello Baby Card by Ellen Haxelmans | Deer Friend Stamp Set by Newton's Nook Designs #newtonsnook #handmade
    1. (Photo on Top Left) First think of an idea on what you want to create and start coloring the images. I started with some elements from the “Deer Friend” and the “Fox Hollow” stamp set and colored them with Copic Markers.
    2. (Photo on Top Right)When the images are colored, first check where the window should be placed on the outside of the card. If you know that you can cut the window (I’m using the stitched frame from the Newton’s Book Club Die Set for it).
    3. Finish the outside of your card. Maybe you can give it color with a stencil or keep it white as I did with a little bow on the side.
    4. As last step you create a flat inside portion. I created a scene with Oxide inks and added a grass border using the Land Borders Die Set. I added the two smallest flags using the Frames & Flags Die Set to hold  the title. The sentiment uses word stamps from the Loveable Laundry Stamp Set and the Simply Relative Stamp Set set to created a lovely message.
    Here is how the finished card looks when it's closed. 
    Just part of the scene peeks out from the window:
    Interactive Hello Baby Card by Ellen Haxelmans | Deer Friend Stamp Set by Newton's Nook Designs #newtonsnook #handmade

    When the card is opened the message is revealed along with the rest of the scene:
    Interactive Hello Baby Card by Ellen Haxelmans | Deer Friend Stamp Set by Newton's Nook Designs #newtonsnook #handmade

    Here's one last close-up of the scene so you can see the amazing details in the coloring:
    Interactive Hello Baby Card by Ellen Haxelmans | Deer Friend Stamp Set by Newton's Nook Designs #newtonsnook #handmade

    What a fun way to send a surprise message!

    If you love this project by Ellen you can visit her over at her blog Crafty Ellen to see more of her beautiful creations!

    Friday, February 23, 2018

    Interactive Easter Card by Ellen Haxelmans


    Today we have another fun interactive project to share by Ellen! Each month she is sharing an interactive project one week after our new release! 

    Today is she's sharing how to make than amazing layered scene in a card:
    Interactive Easter Card by Ellen Haxelmans | Newton's Easter Basket Stamp Set and other stamps and dies by Newton's Nook Designs #newtonsnook #handmade
    Here are step-by-step instructions on how to make the interactive layers for this card:

    Interactive Easter Card by Ellen Haxelmans | Frames & Flags and Sky Borders Die Sets by Newton's Nook Designs #newtonsnook #handmade

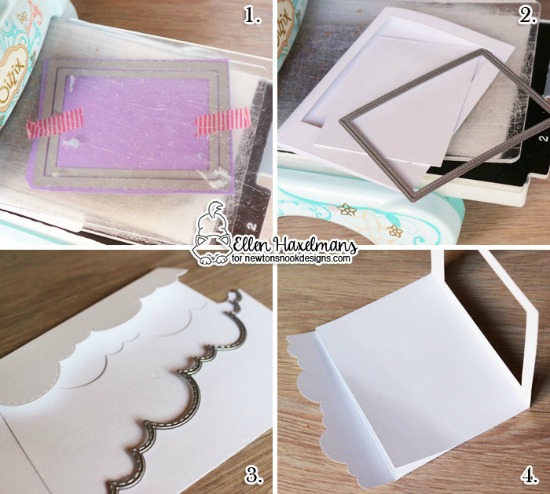
    Step one: Die cut the biggest scalloped square from the Frames & Flags Die Set out a colored paper. Also cut a square out of the rectangle so you get a frame.


    Step two: 
    Cut also a rectangle in the middle of your card base.

    Step three: Cut out a cloud border out of a second card base using the Sky Borders Die Set.

    Step four:  Glue the sides (that didn’t get any cut) from the two card-bases on top of each other.

    Interactive Easter Card by Ellen Haxelmans | Frames & Flags Die Set by Newton's Nook Designs #newtonsnook #handmade

    Step five: Cut out of the transparency the scalloped rectangle and glue it on top of your frame from the card base. On top of the transparency you glue down the frame from step one.


    Interactive Easter Card by Ellen Haxelmans | Newton's Easter Basket Stamp Set and other stamps and dies by Newton's Nook Designs #newtonsnook #handmade

    Now that you have the card layers, you can create your scene any way you would like! For the inside panel of her card today, Ellen created a lovely purple sky and added in a hill using our Land Borders Die Set and a row of houses from our Snow Globe Scene Stamp Set in the far background. then she added in some taller trees from the Fox Hollow Stamp Set and the cute Easter Egg and kitty image from the Newton's Easter Basket Stamp Set. Then she finished it off with some lovely grass cut out using our Land Borders Die Set. 


    Interactive Easter Card by Ellen Haxelmans | Newton's Easter Basket Stamp Set and other stamps and dies by Newton's Nook Designs #newtonsnook #handmade

    On the front panel of the card she layered another tree from the Fox Hollow Stamp Set, some Easter eggs from the Newton's Easter Basket Stamp Set and that cute bunny from the Bitty Bunnies Stamp Set on top of the transparency window! 

    Interactive Easter Card by Ellen Haxelmans | Newton's Easter Basket Stamp Set and other stamps and dies by Newton's Nook Designs #newtonsnook #handmade

    Here is a little video from Ellen where you can see how all the layers come together to make the fun interactive card!


    If you love this project by Ellen you can visit her over at her blog Crafty Ellen to see more of her beautiful creations!