Showing posts with label Balloon Shaker Die Set. Show all posts

Friday, May 24, 2024

Stenciled Gift Bags by Ellen Haxelmans

Stenciled Gift Bags by Ellen Haxelmans | Argyle and Plaid Stencil Sets, Frames & Tags Die Set, Snow Globe Shaker and Pawprint Shaker Die Sets by Newton's Nook Designs #newtonsnook #handmade

Use Stencils to Dress up a Small Gift!

Want a way to make a small gift seem extra special? Ellen shares how you can dress up the packaging using stencils and die cuts! 

She started out by creating stenciling patterns onto two small flat gift bags. She created one with a cat birthday theme and one with a holiday theme. 

Let's look at the cat themed bag first: 

Stenciled Gift Bags by Ellen Haxelmans | Argyle and Plaid Stencil Sets, Frames & Tags Die Set, Snow Globe Shaker and Pawprint Shaker Die Sets by Newton's Nook Designs #newtonsnook #handmade

For this fun bag she used our  Plaid Stencil Set to add a fun teal and pink pattern. This stencil is two pieces and has etching each piece to help you align the pattern so it's easy to add two fun colors. Next she used the small tags from our new Frames & Tags Die Set to cut out two little tags from light pink and teal papers. She added the kitty face from our Pawprint Shaker Die Set and the word "wish" from our Balloon Shaker Die Set. So cute!

Next, let's look at the holiday version:

Stenciled Gift Bags by Ellen Haxelmans | Argyle and Plaid Stencil Sets, Frames & Tags Die Set, Snow Globe Shaker and Pawprint Shaker Die Sets by Newton's Nook Designs #newtonsnook #handmade

This time she used our Argyle Stencil Set to add a red and green argyle pattern to her bag. Again, this stencil is two pieces with etching and makes a quick and easy two color pattern. For the tags on this gift she again used our new Frames & Tags Die Set to cut out two little tags, this time from from red and green papers. Then she added the snowflake and word "joy" using from our Snow Globe Shaker Die Set. 

These cute little gift bags would be perfect for sharing a special cookie treat or little gift. We love how easy it is to create them for different occasions just by mixing up the patterns and colors! 

To see more creations by Ellen, you can visit her over at her blog Crafty Ellen

Tuesday, August 2, 2022

Balloon Filled Birthday Card by Zsofia Molnar

Balloon Filled Birthday Card by Zsofia Molnar | Bokeh Balloon Stencil Set, Balloon Shaker Die Set, Birthday Oval Stamp Set and Frames & Flags Die Set by Newton's Nook Designs #newtonsnook #handmade

Balloon Filled Birthday! 

Balloons are perfect for celebrating special birthdays! Today we have a birthday card by Zsofia that is filled with balloons in a rainbow of bright celebratory colors! 

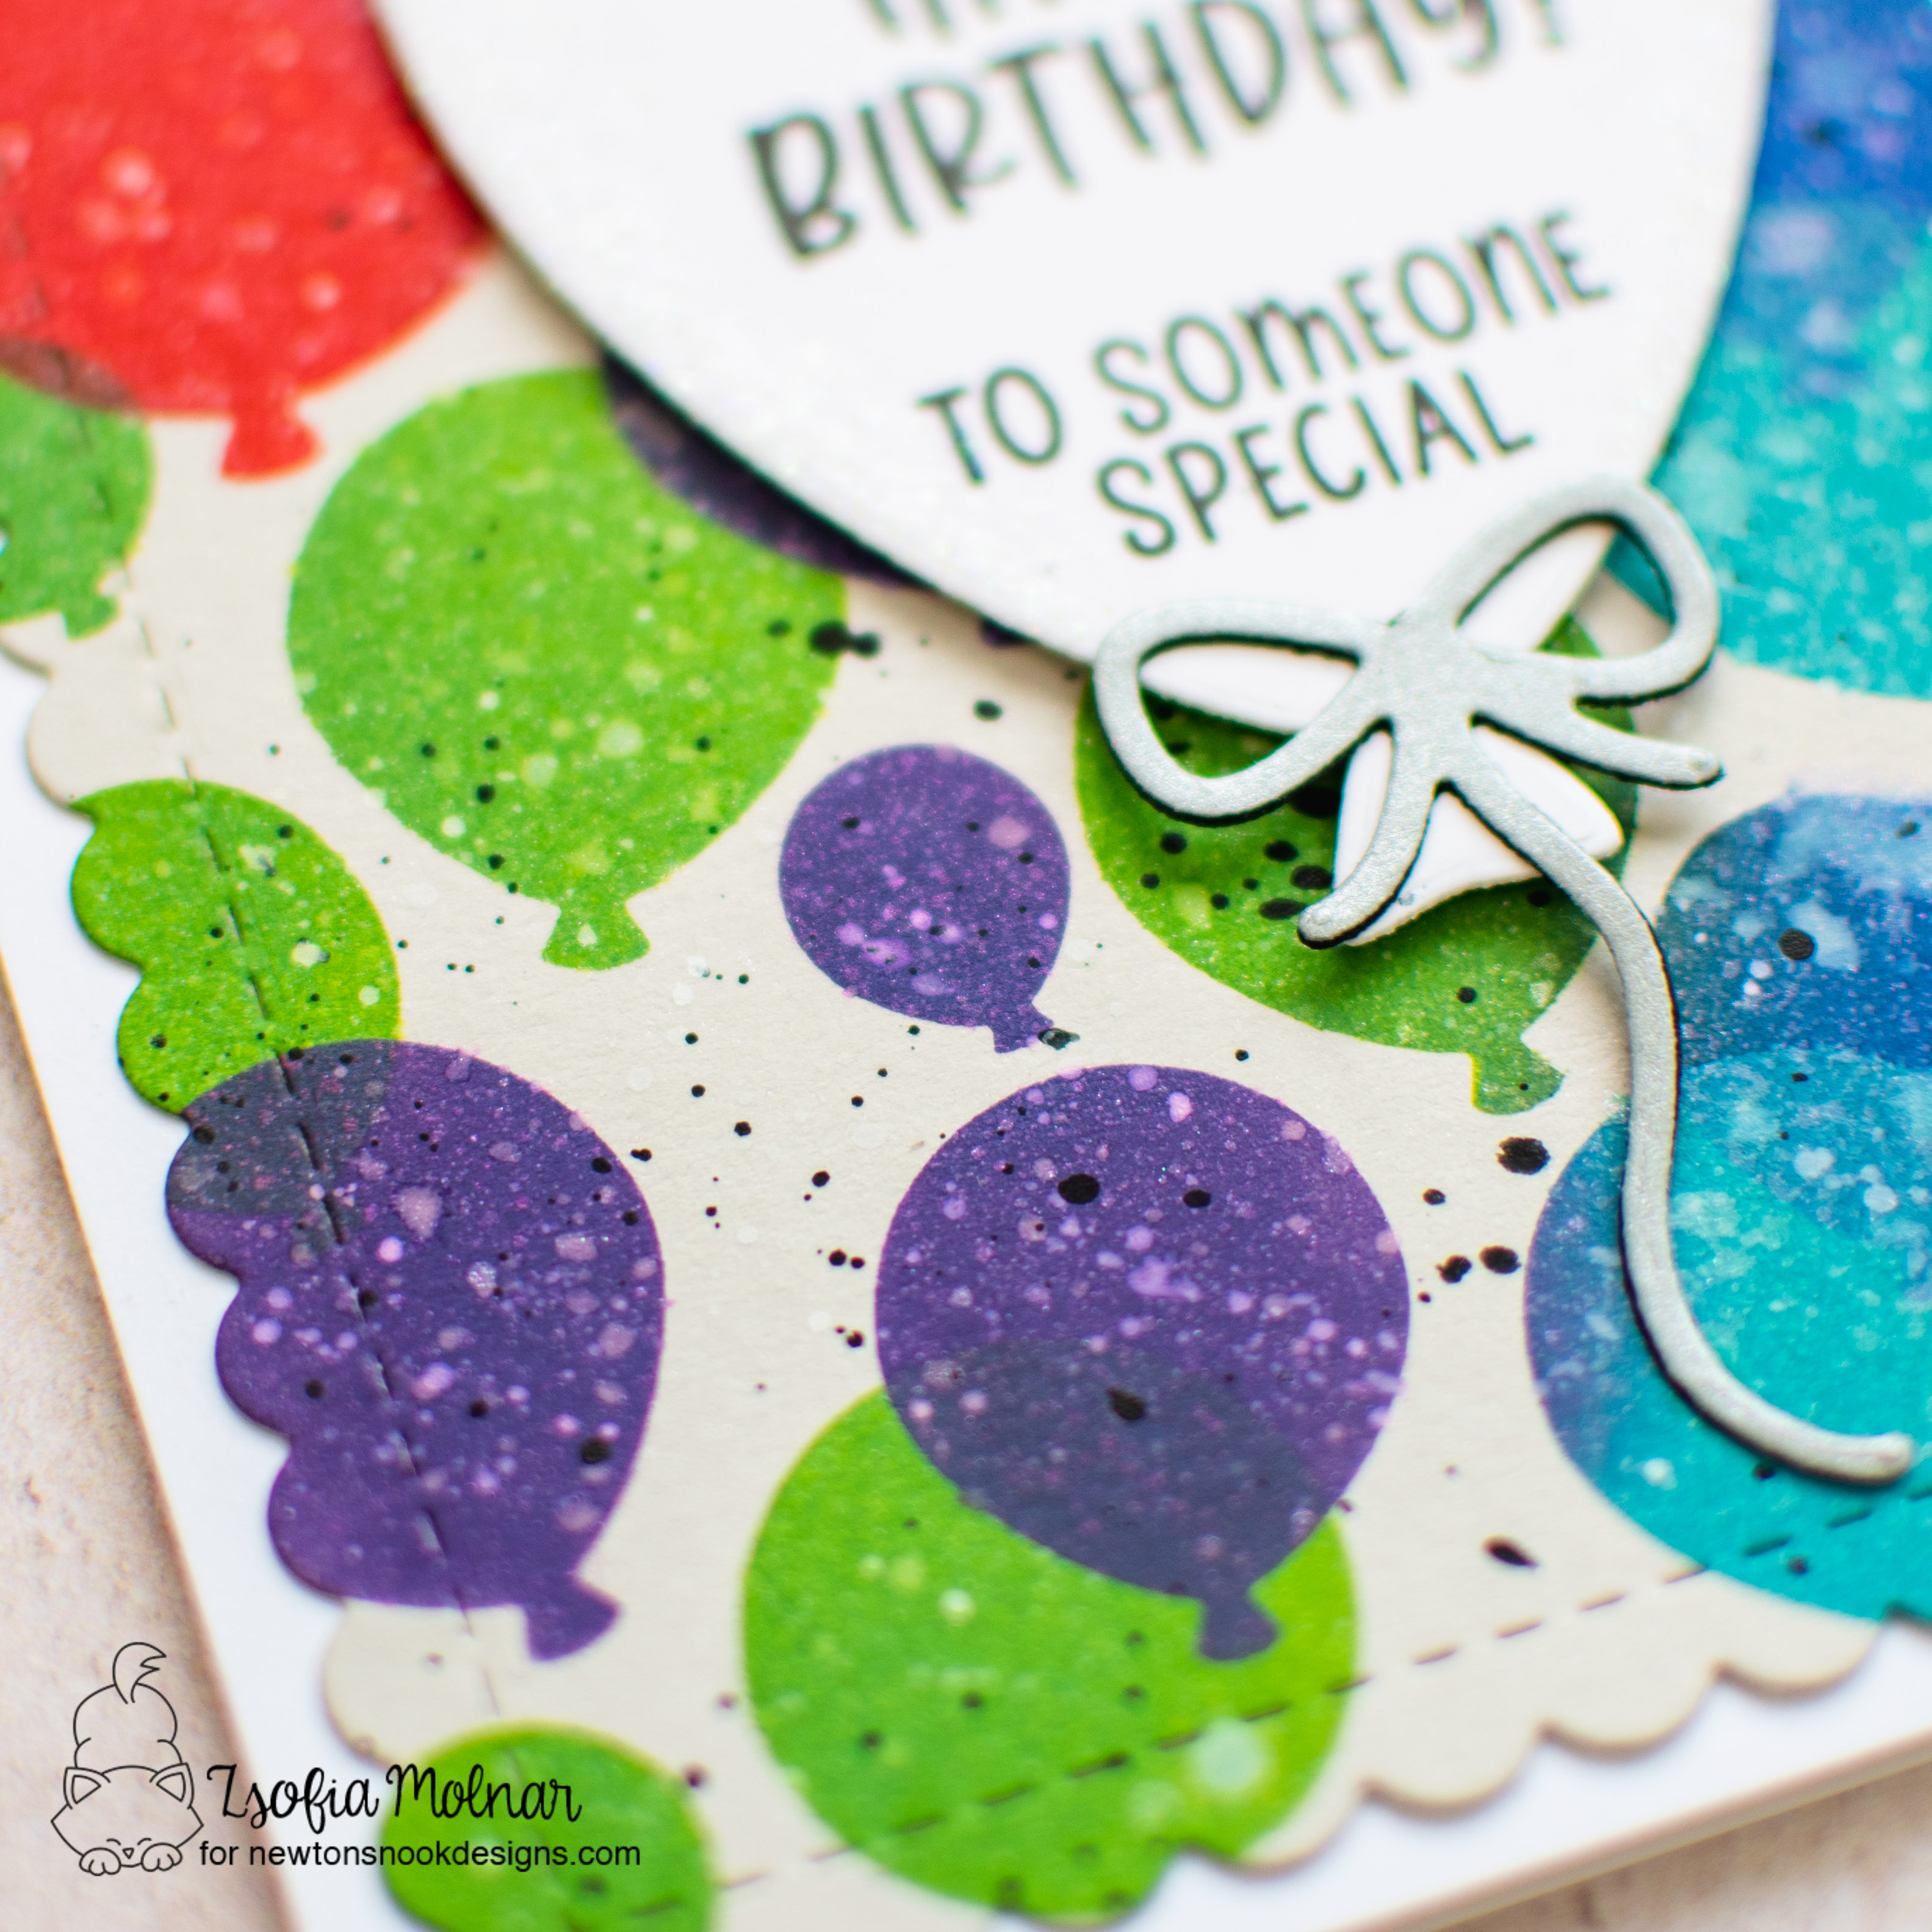
To create this gorgeous card she started with a panel of light gray cardstock and stenciled balloons onto it in several colors using our two piece Bokeh Balloon Stencil Set. The two layers of the stencil let you easily align and overlap the balloons for a fun colorful effect! After the panel was finished she cut it out using our Frames & Flags Die Set to give it the pretty scalloped edge. 

Balloon Filled Birthday Card by Zsofia Molnar | Bokeh Balloon Stencil Set, Balloon Shaker Die Set, Birthday Oval Stamp Set and Frames & Flags Die Set by Newton's Nook Designs #newtonsnook #handmade
To cut out the big balloon in the center, Zsofia used our Balloon Shaker Die Set. She also added the bow and string image, cut out with the same set. For the message she combined several sentiments from the Birthday Oval Stamp Set and stamped them stacked onto the ballon! So fun! 

This fabulous card is filled with a ton of texture too! Here is a close up so you can see all the water and pant splatters she added. What a fun detail!

Balloon Filled Birthday Card by Zsofia Molnar | Bokeh Balloon Stencil Set, Balloon Shaker Die Set, Birthday Oval Stamp Set and Frames & Flags Die Set by Newton's Nook Designs #newtonsnook #handmade
We hope you enjoyed this birthday creation today and are inspired to create some balloon filled birthday cards of your own! 

You can find more of Zsofia's creations and say hello to her over at her blog, Safsafdesign. 


Wednesday, July 20, 2022

Birthday Mouse Shaker Card by Amanda Wilcox

Birthday Mouse Shaker Card by Amanda Wilcox | Birthday Mice Stamp Set, Cloudy Sky Stencil, Balloon Shaker Die Set, Framework Die Set and Birthday Party Paper Pad by Newton's Nook Designs #newtonsnook #handmade

Birthday Mouse Shaker Card

Today we sharing a sky high birthday wish  on this shaker card by Amanda! 

This adorable card features the mouse soaring away with a balloon from our Birthday Mice Stamp Set. She colored the cute little mouse in neutral colors and gave him a bright yellow balloon. The image was cut out using the coordinating Birthday Mice Die Set. She then created a fun balloon shaker shape using our Balloon Shaker Die Set. She cut the balloon shape out of the lime green confetti paper from our Birthday Party Paper Pad and made a fun shaker filled with iridescent sequins. 

Birthday Mouse Shaker Card by Amanda Wilcox | Birthday Mice Stamp Set, Cloudy Sky Stencil, Balloon Shaker Die Set, Framework Die Set and Birthday Party Paper Pad by Newton's Nook Designs #newtonsnook #handmade

For her card base she used another print from our Birthday Party Paper Pad, this time orange party hats. Then she layered a panel of clouds over the top. The clouds were created using our Cloudy Sky Stencil with transfer gel and white flock. I bet they are so fuzzy to touch!  The postage edge on the panel was cut using our Framework Die Set. She also added the sentiment "Hip Hip Hooray" from the Birthday Oval stamp set, embossing it in white onto a black ticket shape (cut out using the Framework Die Set) 

Birthday Mouse Shaker Card by Amanda Wilcox | Birthday Mice Stamp Set, Cloudy Sky Stencil, Balloon Shaker Die Set, Framework Die Set and Birthday Party Paper Pad by Newton's Nook Designs #newtonsnook #handmade
What a delightful birthday card!

To say hello to Amanda and see more of her awesome creations you can visit her over on her blog, Twiddler's Nook! 


Thursday, August 5, 2021

Hello Baby Card by Ellen Haxelmans

Personalized Baby Card by Ellen Haxelmans | Balloon Shaker Die Set, Essential Alphabet Die Set, Falling Leaves Stencil and Frames & Flags Die Set by Newton's Nook Designs #newtonsnook #handmade

Hello Baby Card!

Today Ellen is showing how to create a customized baby card that is perfect for a special baby!

To start out, Ellen die cut a photo of the baby using the balloon shape from our Balloon Shaker Die Set. She used the same die set to cut a balloon shape from acetate, a balloon frame from adhesive foam and a balloon frame from colored paper to create a shaker card. She adhered the foam over the photo then added sequins to the center. Then she added the acetate and colored cardstock frame on top. 

Shaker Balloon for Baby Card by Ellen Haxelmans | Balloon Shaker Die Set by Newton's Nook Designs #newtonsnook #handmade

Once the balloon was assembled she used our Essential Alphabet Die Set to cut out letters to spell the baby's name. She added these on top of the balloon along with the word "hello" from the Loveable Laundry Stamp Set. She also added the string with a bow, also from our Balloon Shaker Die Set, cut out of gold cardstock. 

Shaker Balloon for Baby Card by Ellen Haxelmans | Balloon Shaker Die Set and Essential Alphabet Die Set by Newton's Nook Designs #newtonsnook #handmade

Next, she created a card base to add the shaker shape onto. She was inspired by the parents birth announcement for the baby which included green colors and leaves so she used our Falling Leaves Stencil with green colored inks to create a lovely leaf filled background panel. She also cut out a scallop edged frame using our Frames & Flags Die Set from gray cardstock to frame the stenciled panel. 

Baby Card by Ellen Haxelmans | Falling Leaves Stencil and Frames & Flags Die Set by Newton's Nook Designs #newtonsnook #handmade

Here is another look at the final creation with everything assembled:

Personalized Baby Card by Ellen Haxelmans | Balloon Shaker Die Set, Essential Alphabet Die Set, Falling Leaves Stencil and Frames & Flags Die Set by Newton's Nook Designs #newtonsnook #handmade

We hope this fun project today by Ellen has inspired you to think of fun ways to personalize your creations!

To see more unique creations by Ellen, you can visit her over at her blog Crafty Ellen!


Monday, April 26, 2021

A Duo of Birthday Cards by April Guest Designer Mugdha Gujarathi


Hello Friends, Mugdha here. I can't believe that it's the fourth I monday of the month already. I really enjoyed making cards using Newton's nook products and sharing with you all. Today, I am going to share two cards, both of them are very different from each other!

Birthday Card by April Guest Designer Mugdha Gujarathi | Balloon Shaker Die Set by Newton's Nook Designs #newtonsnook #handmade

I used Balloon shaker die for this card, you can use shaker dies in so many ways and not only for making shaker cards. I used a slimline panel of white cardstock and die cut out the big balloons from the Balloon Shaker Die Set, I also die cut the balloons of the vellum. I used polka dot pattern paper and adhered the white slimline panel on it, I then pasted the vellum balloons and stamped the sentiment "Happy Birthday" from Newton Celebrates stamp set. Lastly, adhered some sequins to finish off my card.

Birthday Card by April Guest Designer Mugdha Gujarathi | Balloon Shaker Die Set by Newton's Nook Designs #newtonsnook #handmade

Here is my second card:

Birthday Cards by April Guest Designer Mugdha Gujarathi | Birthday Roundabout Stamp Set and Circle Frames Die Set by Newton's Nook Designs #newtonsnook #handmade

For this CAS masculine card, I used Birthday Roundabout stamp set. I stamped the beautiful image on black cardstock using versamark ink and heat embossed it with Ranger gold embossing powder and heat tool. I then die cut out the circle with the Circle Frames die set and adhered it on caramel brown cardstock using foam adhesive.

Birthday Cards by April Guest Designer Mugdha Gujarathi | Birthday Roundabout Stamp Set and Circle Frames Die Set by Newton's Nook Designs #newtonsnook #handmade

I stamped the sentiment "Happy birthday" on a strip of caramel brown paper and mounted it on the circle using foam adhesive. Lastly, I added some gold pearls to finish off my card.

I hope you like them.

Thank you so much for stopping by,
Mugdha

Monday, April 5, 2021

Happy Birthday Slimline Card by April Guest Designer Mugdha Gujarathi

It's the first Monday of April today and we are welcoming our April Guest Designer,  Mugdha Gujarathi! We have been enjoying Mugdha's cute and clever creations on instagram and can't wait to see what she creates this month using our products! She will be back each Monday for the month of April with a new project! Keep reading to find out more about her today and to check out her first project below.


Hello Everyone, I am Mugdha Gujarathi from India. I am a Teacher by profession and Crafter by passion. I love Stamping and coloring. I love to make Clean and simple and Slimline cards. Besides Crafting, I enjoy Reading books, cooking, and watching movies.

Blog - craftomania
Instagram - mugdhagujarathi
Facebook - mugdhagujarathi


Mugdha here. I am so happy and excited to be Guest Designer at Newton's Nook for the month of April. Today, I am going to share a cute slimline Birthday card which I made using the Newton Celebrates Stamp Set and the Slimline Masking Circles and Squares Stencil Set.
Let's have a look!

Happy Birthday Slimline Card by April Guest Designer Mugdha Gujarathi | Newton Celebrates Stamp Set and Slimline Masking Squares Stencil by Newton's Nook Designs #newtonsnook #handmade
I started with Stamping the cute images from the Newton Celebrates Stamp Set and colored them using Zigs real brush pens. I then fussy cut all the images.

I used Slimline Masking Square Stencils, Wilted violet and Picked Raspberry Distress Inks for background. I then adhered all the fussy cut images using foam adhesive tape.

Happy Birthday Slimline Card by April Guest Designer Mugdha Gujarathi | Newton Celebrates Stamp Set and Slimline Masking Squares Stencil by Newton's Nook Designs #newtonsnook #handmade
I stamped the sentiments from the same stamp set on strips of paper and pasted them. I die cut out some confettis using a Balloon Shaker Die Set and adhered them to finish off my card.
 
Lastly, I adhered the entire slimline card panel on 8.5 inches to 3.5 inches folded card base.

Thank you!
Kind regards,
- Mugdha

Wednesday, January 13, 2021

Happy Birthday Puppy Card by Amanda Wilcox

Happy Birthday Puppy Card by Amanda Wilcox | Puppy Playtime Stamp Set, Balloon Shaker Die Set, and Confetti Stencil by Newton's Nook Designs

Happy Birthday Card with Puppies!

If you have a friend who is a dog lover, then this birthday card by Amanda would be the perfect fit! She created this adorable puppy birthday card featuring four different dogs from our Puppy Playtime Stamp Set. She colored them all in neutral shades of brown and gave them shiny black noses and teal and yellow accessories! The were cut out using the coordinating Puppy Playtime Die Set.
Happy Birthday Puppy Card by Amanda Wilcox | Puppy Playtime Stamp Set, Balloon Shaker Die Set, and Confetti Stencil by Newton's Nook Designs
The four pups were added to the card, surrounding a balloon that was cut out using our Balloon Shaker Die Set. She made the balloon into a shaker, filling it with gold sequins. She added the Happy Birthday Sentiment on top, stamped from our Uplifting Wishes Stamp Set. She also added fun patterns in the backgrounds using our Confetti Stencil and added little wavy hills behind each pup using our Sea Borders Die Set. 
Happy Birthday Puppy Card by Amanda Wilcox | Puppy Playtime Stamp Set, Balloon Shaker Die Set, and Confetti Stencil by Newton's Nook Designs
We hope you enjoyed adorable birthday card by Amanda today! To say hello to her and see more of her awesome creations you can visit Amanda over on her blog, Twiddler's Nook!

Monday, October 26, 2020

Pretty in Pastel Birthday Cards by October Guest Designer Farhana S

Can you believe it’s the last Monday in October? I am so sad that this is my last post as Guest Designer. If you haven’t realized already, I love Newton’s Nook Design products, thankfully I will still have the Inky Paws Challenge to create for! For my last pair of cards, I made my favourite and most used cards! With all the little friend’s birthdays we get invited too, I always need to keep a few in hand!

Pretty in Pastel Birthday Cards by October Guest Designer Farhana S | Birthday Roundabout Stamp Set and Balloon Shaker Die Set by Newton's Nook Designs #newtonsnook

I’ve been drawn towards pastel colors lately, so I used that as a starting point for these cards, I also wanted to make a slimline card for one of my posts, but since the Newton Nook Slimline Dies just got back into stock, I decided to play around with some older products to pull together a slim line card.

Pretty in Pastel Birthday Cards by October Guest Designer Farhana S | Birthday Roundabout Stamp Set by Newton's Nook Designs #newtonsnook

For my first card, I started by stamping and coloring the Birthday Roundabout Stamp Set using copic markers, I used ALL the lightest shades that I have! Then I die cut it with the largest circle from the Circle Frames Die Set. Then I trimmed down a piece of pattern paper that matched my coloring, added it to a card base, and adhered the colored image a little off set. Finally finished off with a sentiment from the Birthday Roundabout Stamp Set, embossed in black on to a strip of paper, which I trimmed into a banner before adhering it onto my card.

Pretty in Pastel Birthday Cards by October Guest Designer Farhana S | Balloon Shaker Die Set by Newton's Nook Designs #newtonsnook

For my second card, I started by stamping and heat embossing the Birthday Roundabout Stamp Set three times in white ink of white cardstock. Then I added color by ink blending with distress oxides in a pastel rainbow. I buffed the images with a towel to let the white embossing pop, then I die cut 3 balloons using the Balloon Shaker Die Set and also some of the strings that I later colored yellow with some ink blending. So assemble the card I started ink blending a cloud background on to a slim line card front using some distress oxide ink. Then I mounted the balloons using some foam tape for added dimension, and liquid glue to tuck in the strings underneath. Finally I embossed a sentiment from the Uplifting Wishes Stamp Set on the bottom corner. And done!

Which one is more your style? Detailed coloring or easy ink blending? Let me know in the comments below and please follow me on Instagram to see my cards for Inky Paws Challenges to come!

Lastly, thanks again Jennifer and Samantha! You two made my card making dream come true! I can’t wait to add more Newton Nook products to my crafty stash!

-Farhana

Friday, April 24, 2020

Balloon Shaker Card by Ellen Haxelmans

Balloon Shaker Card by Ellen Haxelmans | Balloon Shaker Die Set, Balloons Stencil and Frames & Flags Die Set by Newton's Nook Designs #newtonsnook #handmade

Send a Happy Wish!

Today we are sharing a gorgeous balloon shaker card by Ellen! This fun balloon themed card would for a spring Birthday greeting or just to send to a friend to lift them up!

She created a fun Balloon shaped shaker window using our Balloon Shaker Die Set. This die set includes the balloon shape as a solid shape and a frame, which makes creating shaker windows simple! The die set also includes a string for the balloon and some small confetti shapes that you can fill inside. Ellen used the small confetti shapes combined with sequins to fill her shaker. She also used the die cut word "Wish" from the same die set.

Balloon Shaker Card by Ellen Haxelmans | Balloon Shaker Die Set, Balloons Stencil and Frames & Flags Die Set by Newton's Nook Designs #newtonsnook #handmade

She used our Balloons Stencil with multiple colors of ink to create a colorful balloon background! She has some tips on how to do this technique below. The purple scallop edged frame was die cut out using our Frames & Flags Die Set.

Tips on using multiple colors on a stencil!

Below we have some tips from Ellen on how to create a fun multicolor background with a stencil:
  1. Draw all the balloons on a piece of masking paper with the help of the stencil and a pen.
  2. Cut out a square around the balloons you drew and then cut out the balloon itself. You don’t need to cut it out perfectly but not too wide.
  3. Mask off the balloons with the same size and go over it with inks
We hope you are inspired to try to create some colorful stenciled backgrounds of your own! If you do, make sure to share them with us by using #newtonsnook on instagram or posting them in our Create & Share group on Facebook!

To see more beautiful creations by Ellen, you can visit her over at her blog Crafty Ellen to see more of her beautiful creations!


Tuesday, February 11, 2020

Happy Birthday Shaker Card by Zsofia Molnar

Happy Birthday Shaker Card by Zsofia Molnar | Puppy Playtime Stamp Set, Uplifting Wishes Stamp Set, Balloon Shaker Die Set, Frames & Flags Die Set, Balloon Stencil and Hills & Grass Stencil by Newton's Nook Designs #newtonsnook #handmade
Today we are sharing an adorable shaker card by Zsofia that is perfect for a special birthday wish!  She created a fun shaker balloon shape using our Balloon Shaker Die Set with fun shiny specialty papers. Inside the shaker shape she used the sentiment from our Uplifting Wishes Stamp Set along with some bits of sparkly confetti. What a lovely effect!
Happy Birthday Shaker Card by Zsofia Molnar | Puppy Playtime Stamp Set, Uplifting Wishes Stamp Set, Balloon Shaker Die Set, Frames & Flags Die Set, Balloon Stencil and Hills & Grass Stencil by Newton's Nook Designs #newtonsnook #handmade
She surrounded the balloon with a puppy on each side from our Puppy Playtime Stamp Set. Isn't it adorable how she colored each puppy with different shades of brown and gave them matching green and blue accessories? She cut the puppies out using the coordinating Puppy Playtime Die Set. Here's a close-up of one of  those cute puppies. Isn't it cute how she added the bone to the end of the balloon string too?
Happy Birthday Shaker Card by Zsofia Molnar | Puppy Playtime Stamp Set, Uplifting Wishes Stamp Set, Balloon Shaker Die Set, Frames & Flags Die Set, Balloon Stencil and Hills & Grass Stencil by Newton's Nook Designs #newtonsnook #handmade
For the card background she created a scallop edged panel using our Frames & Flags Die Set
and filled it with balloons using our Balloons Stencil. She also added some green grass along the bottom using our Hills & Grass Stencil. What a lovely scene, perfect for a special birthday greeting!

Thank you, Zsofia, for inspiring us to mix and match these fun products together! You can find more of Zsofia's lovely creations and say hello to her over at her blog, Safsafdesign.


Thursday, September 27, 2018

Personalized Birthday Card by Tatiana Trafimovich

Personalized Birthday Card by Tatiana Trafimovich | Balloon Shaker Die Set, Fabulous Frenchies Stamp Set and Essential Alphabet die set by Newton's Nook Designs #newtonsnook #handmade

Birthday Balloons!!

Today we are sharing a fun way to create a personalized birthday card by Tatiana! She started out by creating a whole bunch of colorful balloons in the background. She creatively used the top part of the die that goes with the balloon from our Fabulous Frenchies Die Set to create a quick stencil and then inked the colorful balloons using distress inks. Then she carefully used just the balloon string from the balloon stamp from our Fabulous Frenchies Stamp Set to stamp on the strings! So creative!

Personalized Birthday Card by Tatiana Trafimovich | Balloon Shaker Die Set, Fabulous Frenchies Stamp Set and Essential Alphabet die set by Newton's Nook Designs #newtonsnook #handmade

Then, for the big balloon in the center of the card she used the balloon die cut from our Balloon Shaker Die Set, inking it up with distress inks. She added the number 18 from the Essential Alphabet Die Set. She added the "it's your birthday" sentiment embossed on a piece of black cardstock using our Newton’s Birthday Bash Stamp Set. She also used the birthday hat from this set, placing it over the 8. The bow tie is from the Papa Bear Stamp Set and the star die cuts were cut out using the stars from the Cosmic Newton Die Set.

You could easily make this card for any age, just by changing the number! So creative!

To see more details on her projects today and more of her beautiful creations you can visit Tatiana at Tatiana Craft and Art. 


Wednesday, September 26, 2018

Tea-Rex Card by Nakaba Rager

Tea-Rex Birthday Party Card by Nakaba Rager | Tea Rex Stamp Set and Sunscape and Confetti Stencils by Newton's Nook Designs #newtonsnook #handmade

ParTEA Rex! 

This adorable card by Naki today will make you laugh!  She used our cute new dino holding tea from our Tea-Rex Stamp Set for the image. She colored him and cut him out with the coordinating Tea-Rex Die Set. Then she made a hilarious sentiment by paring the "TEA-REX" words from this set along with the "Par" from the word party from our Naughty Newton Stamp Set  to make a "ParTEA-Rex! So funny!

For her card background she used our Sunscape Stencil to create the grey rays and added some birthday confetti with embossing paste and our Confetti Stencil. She also added a party hat onto the dino using a hat die cut from our Balloon Shaker Die Set!

This card is so unique and fun for a birthday party! Thank you for the smiles today, Naki! If you like this project you can see more of Naki's work  you over on her blog, Notes from Naki. Stop by and say hello!