Monday, July 31, 2017

Newton's Nook Designs & Xyron Inspiration Week - Day 1 with Naki and Ellen

This is our second post today! To see an amazing Birdbath card by our Guest Designer, Cynde Whitlow, scroll down or click here

This week we are partnering with Xyron for a very awesome inspiration week! Each day we will have fresh inspiration using Newton's Nook Designs products with Xyron adhesives on the NND blog and Xyron will be featuring  projects as well on the Xyron facebook page! There are prizes too! Read all the way to the end of this post to find out how you can win!

Today we are featuring projects by Naki and Ellen

First up is the is adorable cactus card by Naki:
Newton's Nook Designs & Xyron Inspiration Week | Cactus card by Nakaba Rager | Cultivated Cacti Stamp Set  by Newton's Nook Designs #newtonsnook #xyroninc
For her card, Naki used our Cultivated Cacti Stamp Set to create that trio of adorable cacti! To add some more whimsy to her card she cut out a cake stand using our Love and Chocolate Die Set, added an umbrella from the Tiki Time Stamp Set and sunglasses from the Newton's Summer Vacation Stamp Set! The sentiment "Thanks for Sticking by me" is from the Cultivated Cactus Stamp Set. She used the Teresa Collins Mega Runner by Xyron to put it all together!

Visit Naki's blog: notes from Naki to see more and leave a comment for another chance to win!


Next we have an interchangeable magnetic card by 
Ellen

Newton's Nook Designs & Xyron Inspiration Week | Toucan Magnet card by Ellen Haxelmans | Toucan Party Stamp Set by Newton's Nook Designs #newtonsnook #xyroninc


Ellen used our Toucan Party Stamp Set to create a cute little toucan that attaches to the card with a magnet on the back. She used the Teresa Collins 1.5" Create-A-Sticker Machine from Xyron with a magnet cartridge to make her magnets. She trimmed out the Toucan and the magnet using the coordinating Toucan Party Die Set.  She also added in that cute floral wreath for the toucan to sit in using our Happy Little Thoughts Stamp Set and coordinating Happy Little Thoughts Die Set.  She also added in a fun blue leaf background using our Tropical Leaves Stencil

She created a total of three different toucans that you can use to decorate the card front, complete with accessories! (The bow tie and birthday hat are from the Pug Hugs Stamp Set and the stocking hat is from the Fox Hollow Stamp Set

Newton's Nook Designs & Xyron Inspiration Week | Toucan Magnet card by Ellen Haxelmans | Toucan Party Stamp Set by Newton's Nook Designs #newtonsnook #xyroninc
Visit Ellen's blog: crafty ellen to see more and leave a comment for another chance to win!

Would you like to win a Prize pack including a Mega Runner from Xyron and a $25 store credit to Newton’s Nook Designs? 

Here's how to win: 
Leave a comment on the NND & Design Team blog posts using Xyron products all week (July 31-Aug 4th) to enter. One winner will be randomly chosen from blog posts throughout the week so the more posts you leave comments on the better your chances are of winning! You have until Friday August 4th at midnight CST to comment. The winner will be announced on the NND blog post on Monday, August 7th.

Xyron will also be giving away a prize pack! Make sure to visit the Xyron facebook page each day this week for inspiration and leave comments there for another chance to win!


Newton's Birdbath Card with July Guest Designer Cynde Whitlow


Hey folks!

I am back with my fourth and final guest design post for Newton's Nook! I gotta say, I have had soo much fun making all four of these cards! I cannot tell you what an honor it's been to share some Newton's Nook creativity with you all.

I knew I wanted to use Newton's Birdbath on my card today. I mean seriously peeps, you could stamp this image on a card panel, color it and call it a day. It's so cute and could totally stand on it's own for a clean and simple card. I however, cannot leave well enough alone.


Newton's Birdbath Card with July Guest Designer Cynde Whitlow | Newton's Birdbath stamp set by Newton's Nook Designs #newtonsnook #handmade

If you've been following along with me, you will see that I had used the Versatile Vases Stamp Set on THIS card. Since I already had the masks cut for that card, I thought I would take advantage of that and use them again.

I stamped all of my images on a 5"x5" White Card Panel with a Copic friendly black ink. Remember when you mask out a scene folks, always work front to back! It can also be super helpful as you work front to back to also stamp from the sides towards the center of your panel.

These flowers would look super fab in lots of different colors, but I took my inspiration from my neighbor. She does a theme of colors in her flower beds every year. This year, the entire bed is different shades of red.


Newton's Birdbath Card with July Guest Designer Cynde Whitlow | Newton's Birdbath stamp set by Newton's Nook Designs #newtonsnook #handmade
Using the stencils I had made from the Sky Borders Dies Set on THIS card, I used a Grey Copic Multiliner and traced in some clouds. You could use black, but I figured since I was going to color in the entire background and there is allll of that red, grey would be better.

Newton's Birdbath Card with July Guest Designer Cynde Whitlow | Newton's Birdbath stamp set by Newton's Nook Designs #newtonsnook #handmade

For my Copic color choices, I used 3 different color families of red as well as the blue. That's a whole lotta of red and blue ladies and gents.

To finish of my card, I adhered it to a White Cardstock Card Base. Then I added some Clear Wink of Stella to the clouds and center of some of the flowers. On the daisy shaped flowers, I added some Sakura Stardust Glitter Pen. Last, but certainly not least, I used a Sakura Clear Glaze Pen on Newton's nose, the pads of his feet and the butterflies.

That's it! I hope you've enjoyed my cards folks. Thanks so much for stopping by to see me, it's been a blast!

Until next time!

-Cynde

Friday, July 28, 2017

Best of Cluck Card by Amanda Bodine

Best of Cluck Card by Amanda Bodine | Chicken Scratches Stamp Set by Newton's Nook Designs #newtonsnook #handmade

Best of Cluck!

Today's adorable chicken card by Amanda will make you smile! This card using our Chicken Scratches Stamp Set would be so fun to send a friend who needs a little luck or just for fun! She stamped and colored those three chicks and the hen from and added them onto a hill that she created using our Land Borders Die Set. She added little bits of chicken feed (also a stamp from this set) on the ground too. Then she layered some polka dot red and white paper, black cardstock and black and white twine across the bottom! I love how those colors coordinate with the hen and make it pop! The fun textured pattern in the sky adds some fun detail too. For her sentiment she used the "Best of Cluck" and added in a little bit of stamped chicken wire too, also from the Chicken Scratches Stamp Set! Everything on this card coordinates so well together! 

Thanks for the adorable card today, Amanda! To see more of her beautiful coloring and projects, visit Amanda over at her blog,  RutabagaPie Designs!

Thursday, July 27, 2017

Have a Blast Card by Tatiana Trafimovich

Have a Blast Card by Tatiana Trafimovich | Cosmic Newton Stamp set and Starfield Stencil by Newton's Nook Designs #newtonsnook #handmade

Star gazing with Newton!

This gorgeous scene with Newton star gazing was created by Tatiana! For her card today Tatiana created an amazing night sky background using distress inks to create a dark sky and then she used white embossing paste and our new Starfield Stencil to add the stars! She also created that big moon by using distress inks on a large circle! To complete the scene she added a hill and some layers of grass using our Land Borders Die Set. It's the perfect setting for Newton to do some star gazing! 

For the stamped images, she use the image of Newton gazing through a telescope from our Cosmic Newton Stamp Set along with the fun shooting star. She did some awesome watercoloring on those images! That purple telescope is so awesome! Then she used the coordinating Cosmic Newton Die Set to trim out the images. She finished off the card with the "Have a blast" sentiment from the Cosmic Newton Stamp Set embossed in white over the grass! What a stunning scene! 

Have a Blast Card by Tatiana Trafimovich | Cosmic Newton Stamp set and Starfield Stencil by Newton's Nook Designs #newtonsnook #handmade

You can pop over to Tatiana's blog to see more details on this card too at Tatiana Craft and Art! She also has a video!! Be sure to check it out and leave her some love! Make sure you check out her other beautiful creations too!


Wednesday, July 26, 2017

Welcome Baby Card by Naki Rager

Welcome Baby Card by Naki Rager | Loveable Laundry Stamp set by Newton's Nook Designs #newtonsnook #babycard #handmade

Welcome Baby  

It's always nice to have a few baby cards on hand! Today we are featuring this adorable baby card by Naki! She created this adorable card for a baby boy using our Loveable Laundry Stamp Set. She stamped the different onesie images randomly over her background and embossed them with light blue embossing powder! Then she colored them in with shades of mint green, yellow, gray and orange! So sweet! She also stamped the words sweet, baby and boy around too! Then she added the "welcome baby" sentiment embossed in orange on a strip of vellum! She even added a little duckie that she cut out of the image of the onesie with a duckie on it! The orange clothespin gives the perfect finishing touch! You could easily make this card in shades of pink for a girl or neutral colors if you don't know the gender!

Make sure you head over to say hello to Naki  and see more of her beautiful creations at her blog, Notes from Naki!


Tuesday, July 25, 2017

'ello Card by Holly Endress

'ello Card by Holly Endress | Newton Dreams of London Stamp Set & Pawprints Stencil by Newton's Nook Designs #newtonsnook #handmade

Hello from London!

Today Newton is traveling to London with this adorable card by Holly! She used that cute image of Newton wearing a British flag t-shirt along with the phone booth and Big Ben from our Newton Dreams of London Stamp Set! She colored these images, adding some awesome glossy accents and glitter too and then trimmed them out using the coordinating Newton Dreams of London Die Set. To create the scene she also used the curved hill shape from the Land Borders Die Set. Then she set the whole scene in a circle and added the "'ello" sentiment from the  Newton Dreams of London Stamp Set in a little banner.

For the card base Holly created an awesome background to coordinate with the British flag colors using red and blue inks with our new Pawprints Stencil! How cool is that! I love the way the colors coordinate!

'ello Card by Holly Endress | Newton Dreams of London Stamp Set & Pawprints Stencil by Newton's Nook Designs #newtonsnook #handmade


Here's a video by Holly showing you how she created her card:


Thank you, Holly, for the beautiful card today! You can find more of Holly's creations and say hello to her over at her blog, Hollybeary Creations or visit her YouTube Channel for more fun videos!


Monday, July 24, 2017

Naughty Newton Card by July Guest Designer Cynde Whitlow


Hey folks!

I'm back for my third post in my guest design series for Newton's Nook! Woot!

I gotta be honest, the card I'm sharing with you today is extremely ambitious. It was loads of fun and worth every bit of work that was put in to it. HOWEVER! Don't be intimidated by it. I went totally over the top, but this would be doable on a standard 4.25"x5.5" card panel and just as cute!

Naughty Newton Card by July Guest Designer Cynde Whitlow | Naughty Newton, Hanging Around, Lovely Blooms and Versatile Vases Stamp sets by Newton's Nook Designs #newtonsnook #handmade

did have had plan mapped out before I started making this card. I knew I would be working with quite a few stamps sets and let's be honest folks, 4"x9" is a pretty big canvas. I was really excited to be able to use 4 stamps set though. I don't get to do that very often. On this card I used: Hanging Around, Naughty Newton, Lovely Blooms and the Versatile Vases Stamp Set.

I started by using a ruler and lightly tracing a line just about the bottom edge of my card panel. I needed this to make sure all of my stamps would line up and I would get the proper perspective. Of course, I couldn't help myself I ended up adding an entire frame. What d'ya do?

To save myself a little bit of time, I cut multiple masks out of all of the images. All of them folks. It is a lot, but the trick is to layer 2 pieces of masking paper. Stamp the one on top and cut out both at the same time.


Naughty Newton Card by July Guest Designer Cynde Whitlow | Naughty Newton, Hanging Around, Lovely Blooms and Versatile Vases Stamp sets by Newton's Nook Designs #newtonsnook #handmade

There was only one stamp I had do make a special accommodation for. This was the stamp from the Naughty Newton Stamp Set. It's the one where Newton is sitting next to the pot that's been knocked over. Since I had cut out 2 masks of this image, I took one and carefully trimmed Newton from around the pot. I left the other mask intact.

I placed my panel in a stamp positioning tool and placed the 2 piece mask on the panel where I planned on stamping my image. Then I placed the stamp over the top of the mask. I made extra sure it was line up properly. When I had it where I wanted it, I removed the pot portion of the mask, leaving Newton in place. I didn't ink the entire stamp, I went a little over onto Newton, but it's no big because we have a mask in place. I removed the mask and with a Copic Multiliner, I drew in the rest of the pot.

Naughty Newton Card by July Guest Designer Cynde Whitlow | Naughty Newton, Hanging Around, Lovely Blooms and Versatile Vases Stamp sets by Newton's Nook Designs #newtonsnook #handmade

For the rest of the stamping, I stamped the rest of the images that are in the front, then started working my way backwards. The other trick for something this size is to work from both ends towards the middle of the panel. Stamp as many images at one time as possible. It's a huge time saver aaaaand it really helps to give you an idea where spaces need to be filled. The Versatile Vases Stamp Set has lots of choices and fillers for this!

After all of my images were stamped, I colored them all in with Copic's. The largest jar is from Lovely Blooms Stamp Set and the hanging Newton is from the Hanging Around Stamp Set. They fit together perfectly!

To finish it off, I added some detail with a Signo Uni-Ball White Gel Pen and a Clear Sakura Glaze Pen. Also, no card is complete without a little bit of Clear Wink of Stella. Here is where we call it a day.

I hope you enjoyed my card today and thanks so much for stopping by to see me!

Until next time!
-Cynde

Friday, July 21, 2017

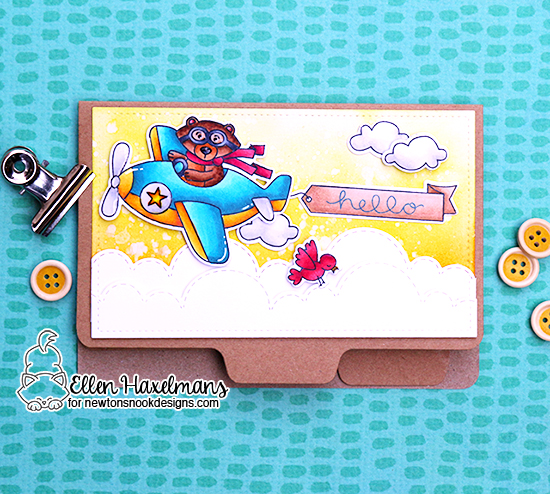
Interactive Birthday Card by Ellen Haxelmans

Interactive Birthday Card by Ellen Haxelmans | Winston Takes Flight Stamp Set by Newton's Nook Designs #newtonsnook

Two scenes in one amazing card!

Today we have another awesome card by Ellen that showcases not one but TWO scenes with Winston! For the front panel of the card she created a sky scene using Winston driving his airplane from our Winston Takes Flight Stamp Set. She made him so cute in his little blue and yellow airplane with the "hello" banner trailing behind. She used the coordinating Winston Takes Flight Die Set to trim him out and also added a fun cloudy skyline using the clouds from our Sky Borders Die Set. She also snuck in that cute little red bird from the Newton's Birdbath Stamp Set

In case you weren't wowed by that scene, you open the card to find this:

Interactive Birthday Card by Ellen Haxelmans | Winston's Lake House Stamp Set by Newton's Nook Designs #newtonsnook

The inside panel of this card has a flap with another fun scene! I think Winston has flown out to his cabin and is now relaxing! She used the image of Winston in his Adirondack chair along with the cattails and cabin image from our new Winston's Lake House Stamp Set and trimmed them out with the coordinating Winston's Lake House Die Set. Then she also added in some big trees from the Fox Hollow Stamp Set and a  cute little frog from the Newton's Rainy Day Stamp Set! Isn't it fun how you can combine images from all the different sets to create scenes? She also used our Land Borders Die Set to add a hill and some grass and the  Sea Borders Die Set to add water along the bottom! These fun border dies are so awesome to use for scene building!

Are you inspired to try creating some scenes? If you do make sure to share them with us over in our Create & Share group on facebook so we can see what you create!!

To seem more of her beautiful creations, you can visit Ellen over at her blog Crafty Ellen!


Thursday, July 20, 2017

Toucan Do It Card by Samantha Mann

Toucan Do It Card by Samantha Mann | Toucan Party Stamp Set & Tropical Leaves Stencil by Newton's Nook Designs #newtonsnook

Toucan Do it!

Today we have a beautiful tropical card by Samantha using our NEW Toucan Party Stamp Set! These fun tropical birds are so fun to color because you can make them any color you like! Samantha used bright pink and yellow for hers along with some teal and orange accents! So fun! Then she used a white gel pen to add a bit fun dots and highlights too! She also colored some fun leaves and flowers from the  Toucan Party Stamp Set. Then she trimmed out all the images using the coordinating Toucan Party Die Set.  For her card base she created a fun strip of pattern across the top using the Tropical Leaves Stencil. Then she embossed the "Toucan do it" sentiment on a piece of black cardstock with white embossing powder! This would be such a fun card to send as encouragement to a friend or really just for fun too! 

Thank you Samantha for awesome inspiration today! To say hello to Samantha and see more of her beautiful creations, you can visit Samantha's Blog, Sam's Scrap Candy!

Wednesday, July 19, 2017

Stencil Cards by Juliana Michaels

Stencil Tutorial by Juliana Michaels | Stamps & Stencils by Newton's Nook Designs #newtonsnook
We are so excited to have stencils as part of our product line and we just released our first four designs last week with our July Release! Today we are sharing a sneak peek of three different cards by Juliana using our new STENCILS!  Visit her on her blog today to see her Stencil Tutorial.

I case you haven't had a chance to see our new stencils yet, our first four designs are Tropical Leaves, Starfield, Pawprints and Waves. You can find them all in the shop in our new Stencil Category. These fun designs coordinate with our newest products but they will also go great with many of our favorite sets too! Those paw prints will go with ALL our Newton sets! 
Stencils by Newton's Nook Designs #newtonsnook

Don't forget to pop over to Juliana's blog, 17 Turtles to see how she used these today!


Tuesday, July 18, 2017

Lost at the Lake card by Jennifer Jackson

Lost at the Lake card by Jennifer Jackson | Winston's Lake House Stamp Set & Waves Stencil by Newton's Nook Designs #newtonsnook

Lost at the Lake!

Today I'm sharing a card I created using our NEW Winston's Lake House Stamp Set and Waves Stencil. These two new products go so perfectly together!  For this card I started out with the Waves Stencil and some white embossing paste. I added some color to the paste by squishing a little ink from a distress ink pad onto my craft sheet and then spreading a bit of the paste over it and mixing it up with a palette knife! Then I spread  the blue paste over  the stencil on a white card panel, leaving the top third white, and let it dry.

Lost at the Lake card by Jennifer Jackson | Winston's Lake House Stamp Set & Waves Stencil by Newton's Nook Designs #newtonsnook
I used the image of Winston paddling in a canoe with his doggie friend from the NEW Winston's Lake House Stamp Set. I stamped this image onto watercolor paper with Archival Black ink and colored it using Zig Clean Color Brush Markers. Then I used the coordinating Winston's Lake House Die Set to cut it out. I didn't line it up perfectly (you can tell it's a little too crooked since there isn't white around the dogs head) but since I had spent all the time coloring it I decided it was OK and used it anyway!


I thought about adding the image to the card with just white on the top but I decided it needed more color so I used a couple of Distress Oxide inks to make a orange to yellow sky. I like how it looks like they are boating at sunset! Then I added a spritz of water to give a little texture and then stamped the "I'd Rather be lost at the lake than found at home" sentiment, also from the Winston's Lake House Stamp Set.

Lost at the Lake card by Jennifer Jackson | Winston's Lake House Stamp Set & Waves Stencil by Newton's Nook Designs #newtonsnook

I hope you enjoyed this card today! You can find these fun new products now available in our shop

Monday, July 17, 2017

Newton Rides West Card by July Guest Designer Cynde Whitlow


Hey folks!

I'm back with my second guest design post for Newton's Nook! Today I'm showcasing two stamp sets that were released last month. Ah-dorable.

For this card, I thought I'd really switch gears and go with some no-line coloring on kraft with Prismacolor Color Pencils.
Newton Rides West Card by July Guest Designer Cynde Whitlow | Newton Rides West Stamp set by Newton's Nook Designs #newtonsnook #handmade

Newton on that horse just tickles my funny bone peeps. The name of this stamp set is Newton Rides West so I thought why not make this guy look like he's riding west on his little hobby horse?

The first thing I did was trim down some Strathmore Toned Tan Paper to 5"x5". Then I lightly traced a circle with a pencil in the bottom right hand corner. Use anything you like folks. A die, a bowl, a glass. Whatever's handy to get your circle. It just needs to be big enough o fit your scene.

After I had my circle traced, I stamped all of my images with a Kraft Colored Ink. The two Cacti in the front are from the Cultivated Cacti Stamp Set that was also released last month, These are solid image stamps ladies and gents. However, since I was stamping in a light ink and my plan was to no-line color this was no big.

Newton Rides West Card by July Guest Designer Cynde Whitlow | Newton Rides West Stamp set by Newton's Nook Designs #newtonsnook #handmade

There was very little masking for this card. I let some of my images go outside my circle and only needed to mask of what I wanted to keep inside my circle as well as any images that would overlap. Pretty. Easy.

While I pondered what I wanted my background scene to look like, I colored all of my stamped images first with Prismacolor Colored Pencils. I thought red would make great accents with all of the green and brown I had going on. Boy does that red really pop!

Now for my background. I'm really not a great freehand artist folks. Most of the time I can look at an image and recreate it though. It's not fancy or perfect, but it gets the job done. So, I Googled "desert scenes" and between a combination of a few different images, I sketched out the mountain(?), cliffs(?) behind my foreground images. I went with some orange undertones for this so it would set apart from all of the brown in Newton's Hat and the Horse.

Newton Rides West Card by July Guest Designer Cynde Whitlow | Newton Rides West Stamp set by Newton's Nook Designs #newtonsnook #handmade

For the sky, I made stencils using some acetate and the Newton's Nook Design Sky Border Die Set. Then using the stencils, I lightly traced a portion of each on to the panel. I really wanted the sky and the clouds to pop so I went with bolder blues and took advantage of the White Prismacolor Pencil on the clouds.

To finish it all off, I went over the polka dots in Newton's scarf with a Signo Uni-Ball White Gel Pen. I also added some Signo Uni-Ball Silver and Gold accents to the two Stars and the Horseshoes. A lil bit of Clear Wink of Stella to the Cacti and a dark brown card base and we have ourselves a finish card folks!

That's it! I really hope you enjoyed my card today. Thanks so much for stopping by to see me!

Until next time!

-Cynde

Blog Hop Winners!

4 year Anniversary Blog Hop Winners!

Thank you to everyone for participating in our blog hop. We really enjoy reading all of your comments! Check out below to see if you won! The blogs and the comments were chosen using random.org.

The following four winners each will receive a $25 store credit to newtonsnookdesigns.com

Winner 1 of a $25 store credit was chosen from Larissa's blog:


Winner 2 of a $25 store credit was chosen from Samantha's blog:


Winner 3 of a $25 store credit was chosen from Taheerah's blog:


Winner 4 of a $25 store credit was chosen from the Newton's Nook Designs blog:


Congrats to the Winners! Don't forget - you have 5 days from today to to e-mail us at info@newtonsnookdesigns.com with your full name and email address to claim your prize (it's also easiest if you already have an account set up in our shop)

Have you seen our NEW stencils? You can see the four new designs here. Plus, this week only we are offering the Pawprints Stencil FREE with a $75 purchase!

No coupon code needed - just add $75 into your cart and then add in the Pawprint Stencil
(the item must be in cart at time of checkout to receive discount).


Friday, July 14, 2017

Newton's Nook Designs 4 year Celebration Blog Hop!


Newton’s Nook Designs is so excited to be celebrating our FOUR Year Anniversary - WOW - That's four whole years of getting our paws inky!

I remember how excited I was when our first four sets came in the mail over four years ago! (see photo below) - Now we have over 200 products in our shop! It's been an Incredible journey so far- filled with happiness, stress, lots of excitement and very little sleep! Here are a few behind the scenes photos from this last year of Jeff and I and our little helpers, Newton and Hobbes!
We want to take a minute to say THANK YOU to all our fans, designers and customers who helped make it happen! We are so happy to be here and we can't wait to see what the next year brings!

To celebrate, we have a blog hop and we've invited some very special guests to our hop along with us today! Make sure to scroll down to the end of the post to see the whole list and leave them some sweet comments for a chance to win prizes (details at the end of this post)

Every stop on the hop is sharing cards made with our new products and I made a card to share today too! I LOVE all the sets in the release this month and how they coordinate so perfectly with our BRAND NEW STENCILS! For my card I used our NEW Toucan Party Stamp Set!

Toucan Do it Card by Jennifer Jackson | Toucan Party Stamp set by Newton's Nook Designs #newtonsnook

I've been having so much fun coloring the cute little toucans in this set. For this card I colored the bird with copic markers and trimmed him out using the coordinating Toucan Party Die Set! I created a fun background for him by covering half of the white background panel with  leaves using embossing paste with our NEW Tropical Leaves Stencil! Then I added on a yellow scalloped edge using the scallop from our Sky Borders Die Set. Behind the toucan I added in some tropical leaves and a hibiscus flower using our Hibiscus Die Set! I love how all these products work so well together!

I hope you enjoyed this project. Make sure to visit all the blogs listed below for more fresh inspiration today! Don't forget to check out our new release too. All the items are now available at
newtonsnookdesigns.com! Plus, we're having a sale this week:


Celebrate with us and enter to win!

To celebrate 4 years Newton's Nook Designs is giving away a $25 store credit to spend in their online shop to 4 lucky winners!

Here's how to win: 
Comment on the NND Design Team and Special Guest blogs (see list below)! The winner will be chosen at random from the collective blog hop posts. Make sure to check out each of their blogs and comment for your chance to win. You will not know which blog has been chosen so the more you comment on the better your chances are of winning! You have until Sunday, July 16th at 9pm CDT to comment. Winners will be announced on NND blog post on Monday, July 17th and will need to contact us to claim their prize so make sure you check back to see if you've won!

Special Guests:


Newton's Nook Design Team:


July Release Now Available + Blog Hop Winners

Are you ready to get your paws inky with our new products?

Winners from the blog hop are posted below - scroll down to see if you won

Our new stamps and die sets are now available at newtonsnookdesigns.com
And don't forget to grab our NEW stencils too!

BONUS - for one week only get the new
Pawprints Stencil FREE with a $75 purchase!

No coupon code needed - just add $75 into your cart and then add in the Pawprint Stencil!

Plus - Check out our 4 Year Celebration BLOG HOP
today for a chance to win more prizes! 


July Blog Hop Winners!

Thank you to everyone for participating in our blog hop. We really enjoy reading all of your comments! Check out below to see if you won! The blogs and the comments were chosen using random.org.

The following four winners each will receive a $20 store credit to newtonsnookdesigns.com


From Reveal Day 1 - the winner of a $20 store credit was chosen from Amanda's blog:


From Reveal Day 1 - the winner of a $20 store credit was chosen from the NND blog:


From Reveal Day 3 - the Winner of a $20 prize is from Jennifer's blog:


From Reveal Day 4 - the Winner of a $20 prize is from Ellen's blog:


Congrats to the Winners! Don't forget - you have 5 days from today to to e-mail us at info@newtonsnookdesigns.com with your full name and email address to claim your prize (it's also easiest if you already have an account set up in our shop)


You can shop online now - our new release is up in the store!