Wednesday, May 6, 2020

Graduation Shaker Cards Duo by Andrea Shell

Graduation Shaker Cards Duo by Andrea Shell | Newton's Graduation Stamp Set, Birthday Essentials Stamp Set, and Confetti Stencil by Newton's Nook Designs #newtonsnook #handmade

Celebrate a Special Graduate!

Do you know anyone graduating this year? Today we are sharing a duo of shaker cards by Andrea that are perfect for giving to a special graduate! She created these fun cards featuring that kitty holding up his diploma from our Newton's Graduation Stamp Set. She colored the cut kitty with copics, giving him adorable tiger stripes! She colored the image twice, giving one kitty a blue cap and the other kitty a black one! She also colored several of the little hats that are also included in the set in blue and black. She used the coordinating Newton's Graduation Die Set to cut the images out. Then she created gorgeous inked background using distress inks along with our Confetti Stencil. She assembled the images as shaker cards, cutting out a circle frame and filling the shaker windows with the small graduation caps along with some sequins! The kitty image was adhered over the shaker window. The finishing touch is the word "celebrate" along the bottom, stamped from our Birthday Essentials Stamp Set.

Here is the blue version with the green and blue background:
Graduation Shaker Card by Andrea Shell | Newton's Graduation Stamp Set, Birthday Essentials Stamp Set, and Confetti Stencil by Newton's Nook Designs #newtonsnook #handmade
And the second version with the black hat and rainbow colored background:
Graduation Shaker Card by Andrea Shell | Newton's Graduation Stamp Set, Birthday Essentials Stamp Set, and Confetti Stencil by Newton's Nook Designs #newtonsnook #handmade

Both are so gorgeous I can't pick a favorite!

Thank you, Andrea, for sharing this fun way to celebrate graduates this year!
To see more beautiful creations by Andrea, you can visit her over at her blog, Blissfully Scrappy too!

Tuesday, May 5, 2020

Stenciled Mother's Day Cards by Zsofia Molnar

3 Ways to Create a Card for Mom!

Today we are sharing three gorgeous Mother's Day cards by Zsofia! She created this trio of cards, all featuring our Floral Lace Stencil, used in three different ways!

Stenciled Mother's Day Cards by Zsofia Molnar | Floral Lace Stencil, Mother's Day Stamp Set, and Frames & Flags Die Set by Newton's Nook Designs #newtonsnook #handmade
Card one (pictured above), uses our Floral Lace Stencil with Distress Crackle Texture paste, colored with Distress Oxide inks, on a piece of kraft cardstock. After the paste dries you get a fun textured look! After the stenciled piece was dry she cut the panel out using the scallop edged frame from our Frames & Flags Die Set

Stenciled Mother's Day Cards by Zsofia Molnar | Floral Lace Stencil, Mother's Day Stamp Set, and Frames & Flags Die Set by Newton's Nook Designs #newtonsnook #handmade

She also added a the sentiment from our Mother's Day Stamp Set, embossed in white onto a strip of vellum. She added a little more white to the colors with a white gel pen and added little pearls to the centers for an extra special finishing touch!
Stenciled Mother's Day Cards by Zsofia Molnar | Floral Lace Stencil, Mother's Day Stamp Set, and Frames & Flags Die Set by Newton's Nook Designs #newtonsnook #handmade
For her second card, Zsofia used the the Floral Lace Stencil again on a piece of kraft cardstock. First she used white pigment ink to stencil it, then she moved it to the side a little and stenciled it again with colored Distress Oxide Inks. This gives a fun offset look to the pattern. She also added some gloss glitter gel to the layer with the color before removing the stencil. She again used the scalloped frame from our Frames & Flags Die Set to cut out the panel.

Stenciled Mother's Day Cards by Zsofia Molnar | Floral Lace Stencil, Mother's Day Stamp Set, and Frames & Flags Die Set by Newton's Nook Designs #newtonsnook #handmade
This card also uses the Mother's Day Stamp Set. This time she stamped it with Distress Oxide inks and embossed it with clear embossing powder to add some shine. She added ink to the flowers too and glossy accents to their centers. The panel holding the sentiment was also cut out using our  Frames & Flags Die Set.

Stenciled Mother's Day Cards by Zsofia Molnar | Floral Lace Stencil, Essential Alphabet Die Set, and Sky Borders Die Set by Newton's Nook Designs #newtonsnook #handmade

Zsofia created a third card using leftover colored texture paste from what she had mixed up for the first card! Don't ever let extra supplies go to waste! She created a smaller panel of colored textures with the Distress Crackle Texture paste. When this was dry, she cut a decorative edge on one side using our Sky Border Die Set. Then she added "It's your day" from our Birthday Essentials Stamp Set, embossing it on a black banner with white embossing powder.  She then used our Essential Alphabet Die Set to cut out the letters to spell "MAMA" across the bottom, layering them in kraft paper and then pink! So clever!

Stenciled Mother's Day Cards by Zsofia Molnar | Floral Lace Stencil, Essential Alphabet Die Set, and Sky Borders Die Set by Newton's Nook Designs #newtonsnook #handmade
We hope this trio of cards by Zsofia has inspired you to think of how you can use the same products in many different ways! So fun! 

You can find more of Zsofia's lovely creations and say hello to her over at her blog, Safsafdesign.


Monday, May 4, 2020

Love You Deerly Card by May Guest Designer Jeannean Marshall

Today we have our first post by our May Guest Designer, Jeannean Marshall! Her amazing coloring skills caught our eye on Instagram and we can't wait to to see what she creates as our guest this month! We hope you will enjoy seeing her new creations on our blog each Monday during the month of May! Keep reading to find out more about her today and to check out her first project below!

Exciting news for me! I am May 2020's Guest Designer for Newton's Nook Designs blog and stamp store!! I am so honored and excited for this privilege, and each Monday in May I'll have a post to inspire you on their blog, my personal blog (Paper-Crafting Nean) and have a short picture snippet on my Instagram (jeanneanmarshall).

Card making became my crafting priority when I discovered alcohol markers, and that has since been my most common medium. I'm always up for a new medium or technique though!

I am a dental assistant/lab technician by trade, living in a small, rural Northern Montana town.

I'm looking forward to meeting new card-making friends, and hopefully can inspire you to get crafty during these unique times we are having.

Sending crafty Hugs!!
-Jeannean
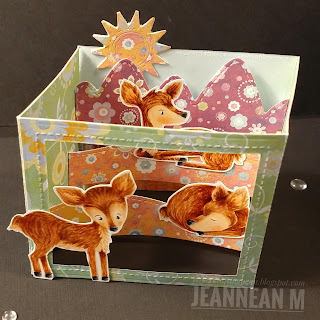
Here's a non-typical card that makes such a cute scene. It's perfect for that special "mom" in your life. I plan to send one to my good friend from high school, eons ago, and the other to my daughter-in-law.

Love You Deerly Card by May Guest Designer Jeannean Marshall | Deer Friend Stamp Set by Newton's Nook Designs #newtonsnook #handmade

I'm using the sweet images and sentiments from the Deer Friends stamp set; making 2 cards, one in a no-lines version. A couple personal tips for no-line coloring; start coloring with a shade lighter in case changes need to be made, color a shade or two darker than normal for the darkest areas to differentiate the shadowy parts, and there are no lines-relax it's okay to not be perfect!! I used the same Copic marker colors on both versions. The white spots are drawn in with a Signo white pen after coloring, and I just noticed I have not drawn them in on the no-lines version. This stamp set also has a coordinating die set for cutting out images, but I just used my scissors.

However, I am using a metal die set to cut the box elements and it will fit into an A2-sized envelope. This card can be made without a die if you want to do a little bit of measuring, cutting and scoring. I'll explain that process below.

Love You Deerly Card by May Guest Designer Jeannean Marshall | Deer Friend Stamp Set by Newton's Nook Designs #newtonsnook #handmade

Here are some dimensions and instructions if you are cutting the box pieces by hand, making this same size card (3 1/4 x 2 3/4 inches finished size). The thing about making this without a die, the height can be changed and be as tall 4 inches and still fit in a standard A2-sized envelope. Just change all the height measurements listed below to be as tall as the finished card size you want! -so change all the 2 3/4 inch measurements to your desired height!


This may seem a little daunting, but really, give it a try!

Outside shadow box panel: 2 3/4 x 11. Cut one. Lightly score long rectangle at 3 1/4, 5 3/8, 8 11/16, 10 3/4. This last score is only 1/4 inch from the edge of the strip. Burnish this score line and bend it forward so the tab is facing up. Place double-sided tape onto this edge you are seeing. (Don't stick box together yet though!!)

Next, cut out the front opening from the large rectangle panel that is on the opposite end of the strip, making sure to leave at least a 1/4 border thickness for the front edges of this front card panel. It can be a rectangle, or any shape and a metal die can be used. (If you are looking at my pictures as a guide, I have done just the opposite large rectangle than I show as my card front, but either side will work in the end. For these written instructions, cutting the end large rectangle as the front of the box is easier to explain.)

Side panels are decorative and optional and can be cut to go either on the outside or inside of the box and these need to be at most 2 3/4 x 2. If these are going inside the card, they need to be adhered now, prior to placing the land strips. If you want side panels the same size as the sides of the card, like I did, the final card will fold up better if you cut just a tiny bit off the width, so it is just short of the corner bends so it folds up without binding. A back panel where a note can be added to the outside of the card needs to be at most 2 3/4 x 3 1/4 and can be adhered at the end of the card making, along with the side panels if they are going onto the outside of the card. My paper is patterned only on one side so I cut side pieces for the inside to show the same print on them.


Inside strips: As many (land) strips as you want can be placed inside the card. These inside strips measure 3 3/4 inches long with a score line in 1/4 inch from each end to make a tab for the adhesive. Put adhesive tape on the outer edge of each tab on the side facing up. Keep the paper cover over the adhesive for now.

Love You Deerly Card by May Guest Designer Jeannean Marshall | Deer Friend Stamp Set by Newton's Nook Designs #newtonsnook #handmade

These strips can be cut as hills, mountains, waves -anything you want! When making these, it is easiest to see items placed inside the box if the highest part of the (hill) strip is offset with the panel in front of it, and the front strips are not as tall as the back strips.

Remove cover paper from the double sided adhesive only on the right side of these inside strips. Depending upon how may strips you are placing inside your box helps determine where to put them. I used 3 strips; 2 land and 1 mountain. Start with the front strip. Fold the right adhesive tab to the back of the strip and place this tab onto the right-side rectangle; closer to the front. Now flip it to the right, out of the way. Take 2nd land strip and adhere the right side tab of it onto the side panel of the box; more toward the middle of this rectangle. Make sure it sits a little higher than the front strip, but still keeping parallel with the bottom of the card. Then flip it out of the way. Lastly do the same with the 3rd strip. On my box card, this is the mountains and I knew I wanted it fairly close to the back of the card.
Love You Deerly Card by May Guest Designer Jeannean Marshall | Deer Friend Stamp Set by Newton's Nook Designs #newtonsnook #handmade

Now that the land strips are all adhered onto the smaller, right-side rectangle, fold all the strips back in toward the card and remove the protective paper from the left side adhesive. Keep the back rectangle -which is the back of the card, and the right side of the card-where all the pieces are now adhered, flat on the table and fold the left half of the card onto the right. WALL-LA! Happy Dance! Now take the paper backing off the adhesive placed on the tab of the 11-inch strip and close up the box. Open 3-D box and then push it closed to the opposite side. Fold back and forth a few times to get things moving good and burnish any folds as needed.

Now you can place all the embellishment pieces onto the card!

I adhered one deer on the very front of the card, and placed the sun on the very back of the card, and one deer on each land strip, giving it the most dimension.

Thanks for sticking it out with me! There are a lot of videos out there, but this card is really not as terrible as it sounds, and the outcome is fantastic!! Let me know if you try it out!

Love You Deerly Card by May Guest Designer Jeannean Marshall | Deer Friend Stamp Set by Newton's Nook Designs #newtonsnook #handmade

One last thing before I go, here's a short video clip of some fun cards I had made a while back featuring the Touchdown Tails stamp set. Newton's Nook Retirement items are at discounted prices so grab your favorites before it is too late!

A fun note about this set is our two rival football teams are the University of Montana-Grizzlies and the Montana State University-Bobcats!! As you can see this set has a bear and a kitty, as well as a referee bulldog and cheering bunny-Perfect for Montana Football cards!! Even if you're not from Montana, these critters are so cute for any football-type, or birthday, card you want to make for THAT person in your life!


Crafty Hugs!!
-Jeannean


Friday, May 1, 2020

Hello Sunshine! Lemon Card by Tina Smith

Hello Sunshine! Lemon Card by Tina Smith | Lemon Twist Stamp Set and Frames & Flags Die Set by Newton's Nook Designs #newtonsnook #handmade

Hello Sunshine!

Today we are sharing a cheerful card with paper piercing by Tina that is sure to brighten your day! She created this fun and card featuring the lemons from our Lemon Twist Stamp Set. She stamped the image of the lemon multiple times onto fun yellow and green patterned papers. She also stamped the image onto white cardstock and die cut it using the coordinating Lemon Twist Die Set. She carefully fussy cut the images out from the patterned papers and layered them over the die cut lemon shapes. This technique is so fun! She added the images to her card, layering them and adding a few little white flowers too. She embossed the sentiment "hello sunshine" in white onto a banner that was die cut from gray striped paper using our Frames & Flags Die Set. She also used the Frames & Flags Die Set to cut out the scalloped border on the white frame.

This card is so lovely! The sunny yellow is perfect for sending a cheery hello to a friend!

Here is a close-up image so you can see the details:

Hello Sunshine! Lemon Card by Tina Smith | Lemon Twist Stamp Set and Frames & Flags Die Set by Newton's Nook Designs #newtonsnook #handmade

 And check out the video by Tina showing you how she created this adorable card:


Don't forget to subscribe to our new YouTube Channel to see more great videos!

We hope you enjoyed this card today by Tina! If you would like to see more of Tina's work you can visit her blog, Cards and Coffee Time. She also has a ton of inspiration on her Cards and Coffee Time YouTube Channel too so make sure to subscribe over there too!

Thursday, April 30, 2020

It's a Good Day Card by Tatiana Trafimovich

It's a Good Day Card by Tatiana Trafimovich | Woodland Picnic Stamp Set, Forest Scene Builder Die Set, Land Borders Die Set and Sunscape Stencil by Newton's Nook Designs #newtonsnook #handmade

It's a Good Day!

Today Tatiana has created a charming picnic scene using the cute critters from our Woodland Picnic Stamp Set. She colored the deer with the picnic basket and the cute squirrel with an apple using copic markers and added little accents with a white gel pen. The critters were cut out using the coordinating Woodland Picnic Die Set.

In the background she created a fun woodsy scene by stenciling the sun ray pattern from our Sunscape Stencil to create a fun two toned sky. Over this she layered some white birch trees, die cut using our Forest Scene Builder die. The whole scene is framed by a circle cut out from a white card front. She also added a line of grass using our Land Borders Die Set and added a bit of dimension to it by coloring it with distress inks! She also added some iridescent sequins for a finishing touch. Those little extra details really make a card feel special!

Along the bottom she stamped the sentiment "It's a good day to have a good day" from the Woodland Picnic Stamp Set. This sentiment is perfect for sending a happy hello to a friend to help them remember to have a good day!

Here's a close up so you can see all the beautiful details:
It's a Good Day Card by Tatiana Trafimovich | Woodland Picnic Stamp Set, Forest Scene Builder Die Set, Land Borders Die Set and Sunscape Stencil by Newton's Nook Designs #newtonsnook #handmade

We hope you having a good day today and are inspired by this lovely card by Tatiana today! If you like this project you can see more of Tatiana's work over on her blog, Tatiana Craft and Art.


Wednesday, April 29, 2020

Miss You Card by Nakaba Rager

Miss You Card by Nakaba Rager | Newton Loves Boxes Stamp Set, Stowaway Newton Stamp Set and Furr-ever Friends Stamp Set by Newton's Nook Designs #newtonsnook #handmade

Miss You!

This sweet card by Naki features kitties stuck in boxes, just like many of us are stuck in our houses right now! It would be the perfect for sending to someone who you miss to let them know you are thinking of them. She created this sweet card using the kitties in boxes from our Newton Loves Boxes Stamp Set. She colored the images using soft pencil colors and then cut them out using the coordinating Newton Loves Boxes Die Set

For that gorgeous heart background she repeatedly stamped hearts using the little bold hearts from our Furr-ever Friends Stamp Set in a rainbow of colors, leaving an opening in the upper left corner for the sentiment. She added some shimmer spray over the whole background to add a bit of sparkle. 

To finish this adorable card, she embossed the sentiment using our Stowaway Newton Stamp Set.

Miss You Card by Nakaba Rager | Newton Loves Boxes Stamp Set, Stowaway Newton Stamp Set and Furr-ever Friends Stamp Set by Newton's Nook Designs #newtonsnook #handmade

We hope this card by Naki has inspired you to create a card to send to someone you miss!
If you like this project you can see more of Naki's work over on her blog, Notes from Naki. Stop by and say hello!


Tuesday, April 28, 2020

My Heart Smiles Card by Zsofia Molnar

My Heart Smiles Card by Zsofia Molnar | Loads of Blooms Stamp Set, Sky Scene Builder Die Set, Fence Die Set, Land Borders Die Set and Frames & Flags Die Set by Newton's Nook Designs #newtonsnook #handmade

Send a Cheerful Smile!

Today we are sharing a vibrant and uplifting Spring card by Zsofia! She features the image of the girl riding her bike with a huge load of flowers from our Loads of Blooms Stamp Set. This image is so perfect for sending a cheerful greeting! She colored the image using gorgeous bright pastels and also colored a couple of extra little individual blooms. The images were cut out using the coordinating Loads of Blooms Die Set. She then created a fun little scene by cutting out a stitched rectangle from teal paper using our Frames & Flags Die Set for the sky. Over this she layered clouds cut out with our Sky Scene Builder Die Set, a fence cut out with our Fence Die Set and grass, cut out with our Land Borders Die Set.

The sentiment, also from the Loads of Blooms Stamp Set was stamped in pink on a circle that was cut out using our Frames Squared Die Set. She layered that on top and added the cute extra flowers to embellish it! A plaid background paper in bright colors completes the fun!

This cheerful scene is sure to brighten your day!

Here is a close-up \ so you can see the lovely coloring details and gloss:
My Heart Smiles Card by Zsofia Molnar | Loads of Blooms Stamp Set, Sky Scene Builder Die Set, Fence Die Set, Land Borders Die Set and Frames & Flags Die Set by Newton's Nook Designs #newtonsnook #handmade

Thank you, Zsofia, for the gorgeous Spring card today! You can find more of Zsofia's lovely creations and say hello to her over at her blog, Safsafdesign.