Tuesday, June 30, 2020

A Little Pickup Card by Zsofia Molnar

A Little Pickup Card by Zsofia Molnar | Farming Fun Stamp Set by Newton's Nook Designs #newtonsnook #handmade

Send a Little Pickup...

Today Zsofia created a sweet and simple card that is perfect for sending a little "pickup" to a friend or family member! She started out by coloring the little pickup truck and wagon from the Farming Fun Stamp Set in fun bright red tones. She cut out the images using the coordinating Farming Fun Die Set. For her card she created setting for truck scene adding a section of subtle gray patterned paper along the bottom half of the card, topped with a stripe of solid gray to make it look like a road. The top half of the card is filled with white cloudy background and she stamped the sentiment "Thought you could use a little pickup!" over the clouds!

It can be fun to create elaborate scenes but this card shows how simply it can be done too! It also has a nice masculine feel and would be great for sending a card to a guy in your life!

Here is a close-up so you can see the added gloss on the tires and door handles:

A Little Pickup Card by Zsofia Molnar | Farming Fun Stamp Set by Newton's Nook Designs #newtonsnook #handmade

Thank you, Zsofia, inspiring us to create simple scenes today! You can find more of Zsofia's lovely creations and say hello to her over at her blog, Safsafdesign.


Monday, June 29, 2020

Five Incredible Roundabout Cards by June Guest Designer Amy Tollner

Hi everyone!! Today is, unfortunately, my last post as the Newton’s Nook Guest Designer for June. I am honored for the opportunity and have had a wonderful time! I LOVE the new Roundabout stamp sets and went a little crazy with them as I have 5 cards to share with you today!
 
Five Incredible Roundabout Cards by June Guest Designer Amy Tollner | Floral Roundabout Stamp Set, Birthday Roundabout Stamp Set, Hummingbird Stamp Set, Monarchs Stamp Set, Circle Frames Die Set, Balloons Stencil, Banner Trio Die Set and Newton's Birthday Bash Stamp Set by Newton's Nook Designs #newtonsnook #handmade

Thanks So Much Card

For this card I stamped the Floral Roundabout Stamp Set in gray ink on colored paper and colored it with Copic markers. It took a little while to find colors that I really liked the look of on the colored paper, but I think I found some good combos! I left the stamp in my stamp positioning tool. After coloring the flowers, I re-stamped them with embossing ink and gold heat embossed the image. I then used the largest scalloped circle from the Circle Frames Die Set to cut out the Floral Roundabout. It came out so beautifully that I knew I didn’t want to cover up too much of it! I used a banner from the Banner Trio Die Set and gold heat embossed the sentiment. I then rubbed the embossing ink pad along the sides of banner and dipped it in the embossing powder. I liked the look so much I used it for the banners on my other circle shaped cards as well!
Thank You Floral Circle Card by June Guest Designer Amy Tollner | Floral Roundabout Stamp Set, Circle Frames Die Set, and Banner Trio Die Set by Newton's Nook Designs #newtonsnook #handmade

Thank You Floral Circle Card by June Guest Designer Amy Tollner | Floral Roundabout Stamp Set, Circle Frames Die Set, and Banner Trio Die Set by Newton's Nook Designs #newtonsnook #handmade

Copic colors used:
  • BV02, BV04, BV08
  • RV04, RV06, RV09
  • V12, V15, V17
  • BG05, BG07, BG09
  • BG32, BG34, BG49
  • G02, G05, G17
  • G24, G94, G99
For a final sparkling touch, I added gold Stickles to the flower centers and berries!

Oh, Happy Day Card

For this card I used the same process for stamping, coloring, and embossing the Floral Roundabout Stamp Set as the previous card except that I used silver embossing powder instead of gold. I used the same color Copics, and just switched them around a little. I used the largest scalloped circle from the Circle Frames Die Set to cut out a piece of silver glitter paper. I then cut out my Floral Roundabout Stamp Set with the largest stitched circle die and adhered it to the scalloped circle with liquid glue. I used a banner from the Banner Trio Die Set and silver heat embossed the sentiment. I then rubbed the embossing ink pad along the sides of banner and dipped it in the embossing powder. I decided to use the Hummingbird Stamp Set, and again used the same stamping, coloring, and embossing process to create a silver heat embossed hummingbird. I fussy cut the hummingbird along the embossing lines so I wouldn’t have any excess white around it, and popped it up with foam tape.

Hummingbird Circle Card by June Guest Designer Amy Tollner | Floral Roundabout Stamp Set, Hummingbird Stamp Set, Circle Frames Die Set, and Banner Trio Die Set by Newton's Nook Designs #newtonsnook #handmade

Hummingbird Circle Card by June Guest Designer Amy Tollner | Floral Roundabout Stamp Set, Hummingbird Stamp Set, Circle Frames Die Set, and Banner Trio Die Set by Newton's Nook Designs #newtonsnook #handmade

Copic colors used for Flowers:
  • BV02, BV04, BV08
  • RV04, RV06, RV09
  • V12, V15, V17
  • BG05, BG07, BG09
  • BG32, BG34, BG49
  • G02, G05, G17
  • G24, G94, G99
Hummingbird: 
  • BV0000, BV000, BV00, BV01, BV02
  • RV0000, RV000, RV00, RV02
  • YG0000, YG00, YG01, YG03
  • BG0000, BG000, BG11

For finishing touches I added silver Stickles to the flower centers and berries, and gave the Hummingbird a sparkling underwing with a glitter pen!

You Are Amazing Card

For this card I stamped the Floral Roundabout in black ink and colored it with Copic markers. I used the largest scalloped circle from the Circle Frames Die Set to cut out a piece of gorgeous purple glitter paper. I then cut out my Floral Roundabout Stamp Set with the largest stitched circle die and adhered it to the scalloped circle with liquid glue. I used a banner from the Banner Trio Die Set and gold heat embossed the sentiment and edges of the banner. Then, I wanted to have one of the beautiful butterflies from the Monarchs Stamp Set fluttering its wings on this card! I stamped two of the same butterfly, using dye ink, leaving the stamp in place in my stamp positioning tool. I colored both butterflies, then stamped them again, this time using black pigment ink, and embossed them with clear embossing powder. That way I was able to get a great contrast with the pigment ink being so dark, and was also able to make them shine! I then cut them out with the matching die set. I adhered the first butterfly with foam tape, then glued only the body of the second butterfly on top, gently bending its wing forward.
Butterfly Circle Card by June Guest Designer Amy Tollner | Floral Roundabout Stamp Set, Monarchs Stamp Set, Circle Frames Die Set, and Banner Trio Die Set by Newton's Nook Designs #newtonsnook #handmade

Butterfly Circle Card by June Guest Designer Amy Tollner | Floral Roundabout Stamp Set, Monarchs Stamp Set, Circle Frames Die Set, and Banner Trio Die Set by Newton's Nook Designs #newtonsnook #handmade
Copic colors used for Flowers:
  • V01, V12, V04, V17
  • RV10, RV13, RV14, RV25
  • Y00, Y02, Y08, Y19
  • YG01, YG03, YG17, YG67
  • G21, G24, G94, G99
  • BG11, BG23, BG15
  • B000, B01, B02, B04
Butterfly: 
  • Y08, Y17, YR04, YR16, YR07
I finished off this card by using different colored sparkling Stickles for the flower centers and berries!

Hip Hip Hooray Card

This time I used the Birthday Roundabout stamp set, stamping the image in gray ink, and coloring it with Copic markers. I used the largest scalloped circle from the Circle Frames die set to cut out a piece of beautiful hot pink glitter paper. I then cut out my Birthday Roundabout with the largest stitched circle die and adhered it to the scalloped circle with liquid glue. I used a banner from the Banner Trio die and gold heat embossed the sentiment and edges of the banner. I then used one of my favorite stamp sets, Newton’s Birthday Bash, along with the matching die set, to stamp, color, and cut out a party hat and Newton holding the balloon. I just love that stamp! I popped Newton up on a Mini Action Wobbler for some added fun!

Cat Birthday Circle Card by June Guest Designer Amy Tollner | Birthday Roundabout Stamp Set, Newton's Birthday Bash Stamp Set, Circle Frames Die Set, and Banner Trio Die Set by Newton's Nook Designs #newtonsnook #handmade

Cat Birthday Circle Card by June Guest Designer Amy Tollner | Birthday Roundabout Stamp Set, Newton's Birthday Bash Stamp Set, Circle Frames Die Set, and Banner Trio Die Set by Newton's Nook Designs #newtonsnook #handmade

Copic colors used for Birthday Roundabout:
  • BV31, BV02, BV04
  • V01, V12, V04, V17
  • RV10, RV13, RV14, RV25
  • Y17, YR04, YR16, YR07
  • Y00, Y02, Y08, Y19
  • YG00, YG03, YG06, YG09
  • BG11, BG23, BG13, BG15
  • B000, B01, B02, B04
  • E50, E51, E53
Newton:
  • C0, C1, C2, C3 – for stripes
  • Ears – R20, R32, R43
  • Nose – R20
  • Balloon – RV13, RV14, RV25, RV29
  • Hat – RV13, RV14, RV25
    YR04, YR16, YR07, YR18
    Y00, Y02, Y08, Y19
    V12, V04
To finish off this card I used a glitter pen and glossy accents for some sparkle and shine!

Happy Birthday Card

For my last card I cut down a 5"x 7" card to an A6 size card, 4 ½" x 6 ¼", because it was the perfect size for the card I wanted to make. I used the Balloons Stencil with one of my favorite things, glitter paste, to make a sparkling background! I then cut out the largest scalloped circle from the Circle Frames Die Set and blended Distress Oxide Ink colors Cracked Pistachio, Peacock Feathers, and Mermaid Lagoon. I cut out a banner using one of the Banner Trio dies and blended the same ink colors onto it. I stamped the Birthday Roundabout Stamp Set onto my ink blended scalloped circle with embossing ink and white heat embossed the image. I also white heat embossed my sentiment onto my ink blended banner. I then stamped and colored Newton holding the balloon and a party hat from Newton’s Birthday Bash Stamp Set and cut it out with the matching die set. I once again popped Newton up on a Mini Action Wobbler in the center of the Birthday Roundabout Stamp Set!

Cat Birthday Card by June Guest Designer Amy Tollner | Birthday Roundabout Stamp Set, Newton's Birthday Bash Stamp Set, Circle Frames Die Set, Balloons Stencil and Banner Trio Die Set by Newton's Nook Designs #newtonsnook #handmade

Cat Birthday Card by June Guest Designer Amy Tollner | Birthday Roundabout Stamp Set, Newton's Birthday Bash Stamp Set, Circle Frames Die Set, Balloons Stencil and Banner Trio Die Set by Newton's Nook Designs #newtonsnook #handmade

Copic colors used for Newton:
  • YR0000, YR000, YR20, YR31 – for stripes
  • Ears – R20, R32, R43
  • Nose – R20
  • Balloon – YG01, YG11, YG03
  • Hat – BG11, BG23, BG13
    YG01, YG11, YG03

I finished off this card by using a glitter pen on Newton’s hat, and giving Newton a shiny glitter balloon!

Five Incredible Roundabout Cards by June Guest Designer Amy Tollner | Floral Roundabout Stamp Set, Birthday Roundabout Stamp Set, Hummingbird Stamp Set, Monarchs Stamp Set, Circle Frames Die Set, Balloons Stencil, Banner Trio Die Set and Newton's Birthday Bash Stamp Set by Newton's Nook Designs #newtonsnook #handmade

I’m sorry this post was so long, but I hope you enjoyed all of the cards today! I have truly enjoyed my time as Guest Designer for June and want to say a huge THANK YOU to Newton’s Nook Designs! It was such an honor to design for my favorite company! Thank you everyone and I hope you all have a great day!!
-Amy

Friday, June 26, 2020

Beautiful Roses Thank You Card by Tina Smith

A Beautiful Thank You!

Today we are sharing a beautiful thank you floral card and video by Tina featuring our new Roses Stamp Set.

I am sad to say that this project marks the LAST blog post for Tina Smith as a regular Design Team Member at Newton's Nook Designs! We have enjoyed having her share her beautiful cards and inspiration with us over the last six months and are sad to see her step down from sharing each new release with us.

However, we will still be featuring Tina over on our YouTube Channel with new videos! Make sure you subscribe to our Newton's Nook Designs YouTube Channel here so you are always alerted when she adds new video content over there!

Thank you, Tina for everything you have inspired us with so far! We look forward to seeing more of your videos in the future!

You can also alway continue to find amazing projects by Tina over at her blog, Cards and Coffee Time!


Now, onto this beautiful card by Tina!
To create this amazing card with a gorgeous layout of roses, she stamped the image of roses from the Roses Stamp Set multiple times so she could layer and overlap them! She colored the blooms in gorgeous shades of pink, orange and yellow and cut the images out using the coordinating Roses Die Set. She tucked in a metallic embossed "thank you" onto a stitched banner that was cut out using our Banner Trio Die Set. She also used our Frames & Flags Die Set to add a the stitched and scalloped border to the background panel. A few irridescent sequins finish add the finishing touch to this gorgeous card.

Here is a close-up image so you can see the details:

Beautiful Roses Thank You Card by Tina Smith | Roses Stamp Set, Banner Trio Die Set and Frames & Flags Die Set by Newton's Nook Designs #newtonsnook #handmade

 And check out the video by Tina showing you how she created this adorable card:


Don't forget to subscribe to our new YouTube Channel to see more great videos!

We hope you enjoyed this card today by Tina! If you would like to see more of Tina's work you can visit her blog, Cards and Coffee Time. She also has a ton of inspiration on her Cards and Coffee Time YouTube Channel too so make sure to subscribe over there too!

Thursday, June 25, 2020

Have a Beautiful Day Card by Tatiana Trafimovich

Have a Beautiful Day Card by Tatiana Trafimovich | Roses Stamp Set by Newton's Nook Designs #newtonsnook #handmade

A Beautiful Birthday!

Today Tatiana has created a gorgeous one layer birthday card featuring our new Roses Stamp Set. She stamped the image of the cluster of roses multiple times along the edge of her card, carefully masking it off to overlap the images. Then she colored the images with gorgeous shades of pink and green using markers. She stamped the "have a beautiful birthday" sentiment, also from the Roses Stamp Set, onto the white are of the card. A bit of pink splatter and some lovely irridescent sequins add the perfect finishing touch.

This card is so lovely on just one layer! It's perfect for sending special birthday wishes!

Have a Beautiful Day Card by Tatiana Trafimovich | Roses Stamp Set by Newton's Nook Designs #newtonsnook #handmade

We hope are inspired to try to make a one layer card like this gorgeous one by Tatiana today! If you like this project you can see more of Tatiana's work over on her blog, Tatiana Craft and Art.

Wednesday, June 24, 2020

A Rainbow Thank You Cards and a Fond Farewell to Nakaba Rager


Saying Thank you & Farewell to Naki!

Today we are sharing a duo of rainbow thank you cards by Naki. She created these simple yet beautiful cards by mixing sentiments from our Thankful Thoughts Stamp Set, stamped in rainbows and metallics! For the long card she also used our Slimline Frames & Portholes Die Set to add the scalloped die cut panel and on the square card she used our Frames Squared Die Set to add the square scalloped panel. Both cards were finished with colorful sequin accents! These cards are so simple and yet have so much fun and character!

I am sad to say that this project marks the LAST post for Naki Rager as part of our Design Team at Newton's Nook Designs! We have truly enjoyed having Naki on our Team for FOUR incredible years! Naki has wowed us consistently with her amazing no-line coloring skills and use of soft watercoloring mixed with metallics! Her cards are always so unique and we truly loved seeing them each month! Plus, she is just the sweetest person ever and we have truly enjoyed her friendship!  We will always consider her part of our NND family! We are so sad to see her go but we feel lucky to have had her hang out with us for so long! We wish her the very best as she takes a break. You will want to keep her blog, Notes from Naki, bookmarked so you can go back to see everything she has created and check for updates! 

I thought it would be fun to re-share a few of our favorite cards by Naki (although it was so hard to choose just a few):
Isn't it cool how Naki colored the kitties from our Newton's Movie Night Stamp Set in just black and white!? She also used our Popcorn Stencil on this card. You can find this card originally posted here

This card is one of my favorites showcasing Naki's no-line coloring! So beautiful! She used our Naughty Newton Stamp Set on this along with a sentiment from our Happy Little Thoughts Stamp Set. This card was first posted here
This card was PURRfect for when everyone was searching the stores for toilet paper this year! Again, she used our Naughty Newton Stamp Set, adding in letters using our Essential Alphabet Die Set and textured loops in the background using our Confetti Stencil. Her card was first posted here. 

This card totally made us smile! She created a custom pun on the Doctor Who TV Series, using our Essential Alphabet Die Set for the letters, our Woof Pack Stamp Set for the big crowd of dogs and 3D glasses too! Details on this card are at this post
This card expresses how we will feel about Naki and her clever and sweet cards! We love how she colored those kittes from our Newton Loves Boxes Stamp Set and that rainbow heart background is stunning! Find details on the original post here

Thank you so much, Naki, for the awesome inspiration! We'll miss you! If you would like to continue to follow Naki you can find her at her blog, Notes from Naki!


Tuesday, June 23, 2020

Under the Weather Card by Jennifer Jackson

Under the Weather Card by Jennifer Jackson | Umbrella Pals Stamp Set, Umbrella Pals Die Set, Raindrops Stencil, Sky Borders Die Set and Frames & Flags Die Set by Newton's Nook Designs #newtonsnook #handmade

Share my Umbrella!

Hello! Jen here today with a fun weather themed card that is perfect for a get well wish! This card features a fun trio of animal themed umbrellas, stamped using our Umbrella Pals Stamp Set. I colored them using copics, adding freckles to the cheek of the raccoon! Then I cut the umbrellas and the coordinating handles out using our coordinating Umbrella Pals Die Set with different colors of cardstock to add some bright tones! 

For the background I created a panel of raindrops using our Raindrops Stencil. Over this I layered a section of clouds using our Sky Borders Die Set and stamped the sentiment "under the weather" on the clouds. I added a scalloped edge to the panel using our Frames & Flags Die Set. I also used this same die set for the black banner that holds the sentiment "share my umbrella", embossed in white. 

Under the Weather Card by Jennifer Jackson | Umbrella Pals Stamp Set, Umbrella Pals Die Set, Raindrops Stencil, Sky Borders Die Set and Frames & Flags Die Set by Newton's Nook Designs #newtonsnook #handmade

To add one more pop of color I chose a bright yellow card base! I think this sunny and cheerful card would be appreciated by anyone who wasn't feeling their best! It's perfect for letting them know you are thinking of them! 

I hope you enjoyed this card today! Thanks for stopping by!

Monday, June 22, 2020

Newton's Sweetheart Slimline Cards by June Guest Designer Amy Tollner


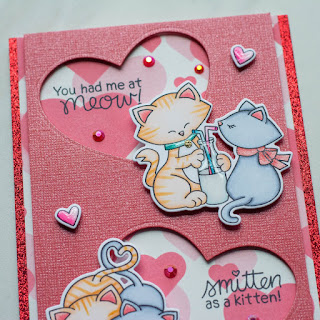
Hi everyone! Slimline cards are all the rage right now and I, along with many other people, just love them! My favorite thing to use with them are the dies that make little windows. I love using many stamps from one stamp set and then stamping cute sentiments in the windows. Well, you can make your own windows on a slimline card using the large heart die from the Darling Hearts Die Set! I used the images and sentiments from Newton’s Sweetheart Stamp Set along with the matching die set to create both cards. These are great cards for Valentine’s Day (I know we have a way to go on that one), Anniversaries, or just to say, “I love you!”

Newton's Sweetheart Slimline Cards by June Guest Designer Amy Tollner | Newton's Sweetheart Stamp Set and Darling Hearts Die Set by Newton's Nook Designs #newtonsnook #handmade

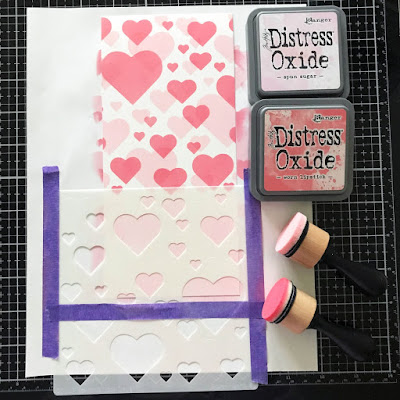
I first made my heart backgrounds with the Bokeh Hearts Stencil Set. Since the card is longer than the stencil I used both layers on the top of the card and then carefully lined up the stencil underneath the design to continue the pattern.

Stenciling by June Guest Designer Amy Tollner | Bokeh Hearts Stencil Set by Newton's Nook Designs #newtonsnook #handmade

I used Distress Oxide Inks, Spun Sugar for Layer 1 and Worn Lipstick for Layer 2.

Next, I die cut my heart windows. I started with the middle heart because I felt it made it easier to get a more equal distance between the windows.

Heart cutouts for Slimline card by June Guest Designer Amy Tollner | Darling Hearts Die Set by Newton's Nook Designs #newtonsnook #handmade

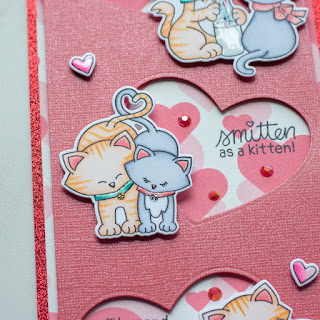
The great thing is, now you also have stitched hearts you can save for another project! I attached the die cut heart panel to my stenciled heart panel using foam tape for some dimension. I stamped the cute sentiments in the heart windows, which I switched up a little between the two cards, and colored my stamped images with Copic markers. I used the same colors on both cards, but changed them around a little too! For the second card I cut the die cut heart panel about ¼ inch thinner so that more of the stenciled heart panel was able to be seen on the sides. I wasn’t planning on making the second card, but I really wanted some more glitter than I had on the first one so I couldn’t help myself!

Newton's Sweetheart Slimline Cards by June Guest Designer Amy Tollner | Newton's Sweetheart Stamp Set and Darling Hearts Die Set by Newton's Nook Designs #newtonsnook #handmade

Newton's Sweetheart Slimline Cards by June Guest Designer Amy Tollner | Newton's Sweetheart Stamp Set and Darling Hearts Die Set by Newton's Nook Designs #newtonsnook #handmade

Newton's Sweetheart Slimline Cards by June Guest Designer Amy Tollner | Newton's Sweetheart Stamp Set and Darling Hearts Die Set by Newton's Nook Designs #newtonsnook #handmade

Newton's Sweetheart Slimline Cards by June Guest Designer Amy Tollner | Newton's Sweetheart Stamp Set and Darling Hearts Die Set by Newton's Nook Designs #newtonsnook #handmade
The Copic colors I used for Newton are:
YR0000, YR000, YR20, and YR31 for his stripes
Belly – W0, W1
Ears – R20, R32, R43
Nose – R20
Collar – BG11, BG23, BG13

Newton’s Sweetheart:
CO, C1, C2, C3
Belly – C0, C1
Ears – R20, R32, R43
Nose – R32
Collar – R20, R22, R14

Straws:
RV00, RV02, RV04, RV06
B000, B01, B02, B04

Glass of Milk:
BG0000, BG000
N0, N1

Little Hearts:
RV00, RV02, RV04, RV06

Newton's Sweetheart Slimline Cards by June Guest Designer Amy Tollner | Newton's Sweetheart Stamp Set and Darling Hearts Die Set by Newton's Nook Designs #newtonsnook #handmade

Newton's Sweetheart Slimline Cards by June Guest Designer Amy Tollner | Newton's Sweetheart Stamp Set and Darling Hearts Die Set by Newton's Nook Designs #newtonsnook #handmade

Newton's Sweetheart Slimline Cards by June Guest Designer Amy Tollner | Newton's Sweetheart Stamp Set and Darling Hearts Die Set by Newton's Nook Designs #newtonsnook #handmade

Newton's Sweetheart Slimline Cards by June Guest Designer Amy Tollner | Newton's Sweetheart Stamp Set and Darling Hearts Die Set by Newton's Nook Designs #newtonsnook #handmade

The Copic colors I used for Newton are:
YR0000, YR000, YR20, and YR31 for his stripes
Belly – W0, W1
Ears – R20, R32, R43
Nose – R20
Collar – B000, B01, B02, B04

Newton’s Sweetheart:
CO, C1, C2, C3
Belly – C0, C1
Ears – R20, R32, R43
Nose – R32
Collar – RV00, RV02, RV04, RV06

Straws:
R20, R22, R14
BG11, BG23, BG13

Glass of Milk:
BG0000, BG000
N0, N1

Little Hearts:
R20, R22, R14


Newton's Sweetheart Slimline Cards by June Guest Designer Amy Tollner | Newton's Sweetheart Stamp Set and Darling Hearts Die Set by Newton's Nook Designs #newtonsnook #handmade
I finished off each card by adding a few pink and red jewels in the heart windows next to the sentiments, using a glitter pen on the little hearts, glossy accents on the glass of milk, and giving the kitties glitter and glossy collars! I hope you all enjoyed my cards this week, and I hope I was able to inspire you to use some of your smaller dies in a new way! Have a great week everyone!!

-Amy

Friday, June 19, 2020

June Release Now Available + Blog Hop Winners!

Are you ready to get your paws inky with our new products?

Winners from the blog hop are posted below - scroll down to see if you won.

Our new products are now available at newtonsnookdesigns.com

June 2020 Release | Newton's Nook Designs #newtonsnook

June Blog Hop Winners!

Thank you to everyone for participating in our blog hop. We really enjoy reading all of your comments! Check out below to see if you won! The blogs and the comments were chosen using random.org.
From Reveal Day 1 - Winner of the Farming Fun from the Newton's Nook Designs blog: Kristina "Tina"


From Reveal Day 2 - Winner of the Bleat Stamp Set from Zsofia's blog: maryredjr


From Reveal Day 3 - Winner of the Neigh Stamp Set from Tatiana's blog:  Anneleise Hampson

From Reveal Day 4 - Winner of the Roses Stamp Set from Andrea's blog: Cindy Hatmaker

From Reveal Day 4 - Winner of the Porch Swing Friends Stamp Set from Ellen's blog: Patsy Blunt


Congrats to the Winners! Don't forget - you have 7 days from today to to e-mail us at info@newtonsnookdesigns.com with your full name, mailing address and the name of the set you won to claim your prize.

You can shop online now - our new release is up in the store!