Friday, March 30, 2018

Toucan Love Card by Larissa Heskett

Toucan Love Card by Larissa Heskett | Toucan Party Stamp Set by Newton's Nook Designs #newtonsnook #handmade     

Toucan Love! 

Today we have an adorable card by Larissa featuring a sweet couple of toucans! She used that cute toucan pair sitting on a branch from our  Toucan Party Stamp Set and colored them with fun bright colors. She even added some shiny gloss to their beaks! She trimmed them out using the coordinating Toucan Party Die Set and added them onto a cute circle center of a flower on her card.

Toucan Love Card by Larissa Heskett | Toucan Party Stamp Set by Newton's Nook Designs #newtonsnook #handmade

She created a custom sentiment using the word "toucan" from the Toucan Party Stamp Set along with the word "love" from the Sending Hugs Stamp Set. So cute! For her background she stamped a bunch of the toucans from the  Toucan Party Stamp Set randomly around the card base in black and added some black ink splatter and sequins too! 

To say hello to Larissa and see more of her creations, visit her over at her blog, Larissa Heskett Designs.

Thursday, March 29, 2018

Make a Wish Card by Tatiana Trafimovich

Make a Wish Card by Tatiana Trafimovich | Cat birthday card using Company of Cats Stamp set and Balloon Shaker Die Set by Newton's Nook Designs #newtonsnook #handmade

Kitty Birthday Card!

Today we are sharing this AMAZING kitty birthday card by Tatiana! She used our adorable Company of Cats Stamp Set to create a big crowd of cats for the front of her card. Since the stamp set isn't quite big enough to cover the whole card front she masked it off and stamped it twice to fill it all the way with cats from side to side! Super fun! Then she colored all those crazy cats giving them fun stripes and spots and adding lime green, pink and teal accents to their scarves and ties! She then fussy cut along the top and added them to a pink card base. She added some festive bubbles to the top using our new Bubbly Stencil and white embossing powder. 

Make a Wish Card by Tatiana Trafimovich | Cat birthday card using Company of Cats Stamp set and Balloon Shaker Die Set by Newton's Nook Designs #newtonsnook #handmade

She also added a bunch of fun little hats and balloons, using the hat and balloon confetti die that is included in the Balloon Shaker Die Set! Isn't it fun how they are the perfect size to fit on those kitty heads?! She also used the die cut "wish"from the Balloon Shaker Die Set and added it along with the "make a" from the Birthday Essentials Stamp Set, embossed on a rectangle of black! 

What an incredible card and a great way to use several of our products together! 

To see more details on her projects today and more of her beautiful creations you can visit Tatiana at Tatiana Craft and Art!


Wednesday, March 28, 2018

Enjoy the Little Things Card by Nakaba Rager

Enjoy the Little Things Card by Nakaba Rager | Naughty Newton Stamp Set by Newton's Nook Designs #newtonsnook #handmade

Enjoy the Little Things! 

Today we are sharing a sweet spring kitty card by Naki! She used the kitty tipping over the plants from our Naughty Newton Stamp Set. She colored the kitty and pots in soft colors using no-line coloring and trimmed out the image using the Naughty Newton Die Set to add it to her card. For the card she die cute a little stitched rectangle panel using the Frames & Flags Die Set created a scene with grass and sky using loose watercoloring. She added the "Enjoy the little Things" Sentiment from our Happy Little Thoughts Stamp Set to finish it off. She is planning to use these cute little cards to add onto little potted plants as teacher gifts! How fun!

To see more beautiful projects by Naki,  you can head over to her blog, Notes from Naki and say hello!

Tuesday, March 27, 2018

Let's Chill Card by Holly Endress

Let's Chill! 

Today we are sharing a fun summer card by Holly!  Her card features two fun popsicles from our Summer Scoops Stamp Set. She colored the popsicles with copic markers and gave them cute little accents with a white gel pen. Then she fussy cut him out to add onto her card.  She also stamped the "Let's chill" sentiment from the set and added it onto a kraft cardstock banner that she cut out using the little banner from the Frames & Flags Die Set.  She also used the Frames & Flags Die Set do cut out the rounded corner stitched rectangle from polka dotted paper. She added some fun popsicle paper in the background and some yellow dots to finish this cheerful summer card!

Thank you, Holly, for the fun card today! You can find more of Holly's creations and say hello to her over at her blog, Hollybeary Creations!

Monday, March 26, 2018

Friends Like You Card by March Guest Designer Mindy Eggen


Happy Monday my crafty friends! Today is (sadly) my last guest designer post for Newton's Nook Designs. It has been absolutely amazing showcasing their products this month and I want to give a big shout out "THANK YOU" to them for me inviting me. You will still see me posting on my blog using their products because I love to color up those images and play along with their challenges.

Speaking of challenges, today's card is playing along with their color challenge #68. There is still time to play along. Visit the Inky Paws Challenge blog to find out all the details and a chance at winning some goodies! 

I started with a piece of Bristol Smooth cardstock cut to 4 1/4" x 5 1/2" and ink blended using Mermaid Lagoon and Squeezed Lemonade distress oxide inks. When the blue meets the yellow it creates a green so I could meet the colors in the challenge. Then I spritzed with water and dabbed with a paper towel.

Easter Card by Guest Designer Mindy Eggen | Newton's Easter Basket Stamp Set by Newton's Nook Designs #newtonsnook #handmade

Next, I cut this frame from the Frames & Flags die set. I lined up where this would be on my card front and stamped my sentiment which is from Newton's Easter Basket stamp set. For my images, I stamped them onto Neenah White cardstock with copic friendly ink and colored with copic markers. There are coordinating dies you can use to cut these images out.

Easter Card by Guest Designer Mindy Eggen | Newton's Easter Basket Stamp Set by Newton's Nook Designs #newtonsnook #handmade

My distressed panel is added to an A2 size card base and then border panel on top. Next, I adhered my image of Newton in the egg with a tape runner and Newton in the Easter basket is attached with foam squares. 

Easter Card by Guest Designer Mindy Eggen | Newton's Easter Basket Stamp Set by Newton's Nook Designs #newtonsnook #handmade

I hope you enjoyed today's card ! 
Copics Used 
V04-01
YG05-01
B04-01
R85-8 1
Y08-04
Newton - YR24-23-21
Basket - E79-57-35-31

Friday, March 23, 2018

Interactive Folding Card with Ellen Haxelmans


Today we have another fun interactive project to share by Ellen! Each month she is sharing an interactive project one week after our new release! 

Today is she's sharing how to make a card with scenes that appear in layers and build suspense as you open the card:

Interactive Folding Birthday Card with Ellen Haxelmans | Newton's Christmas Cuddles stamps and dies by Newton's Nook Designs #newtonsnook #handmade


Here are step-by-step instructions on how to make the folding layers for this card:
Interactive Folding Birthday Card with Ellen Haxelmans  #newtonsnook #handmade
  1. For this card you start using a square card base. One side you cut off half of it. (photo top left)
  2. The next step is to make three flaps with the same measurements as the half sized flap and with a bit extra so you can glue the flap on your card. After cutting the paper I folded the sides with my bone folder. (photo top right)
  3. Glue down the three extra flaps on the rest of the sides. (photos bottom left)
  4. Let the fun begin and decorate your flaps. On her card today Ellen created created three scenes, but you could also decorate each flap with something different.
Here is what Ellen's finished card looks like.
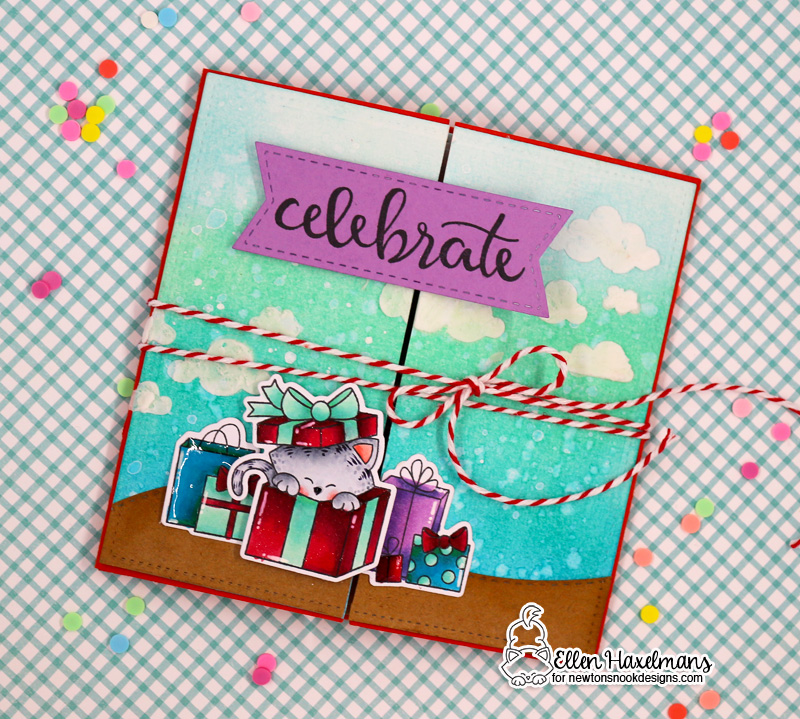
When the card is closed with all flaps folded in, she has a fun birthday scene on the front.

Interactive Folding Birthday Card with Ellen Haxelmans | Newton's Christmas Cuddles stamps and dies by Newton's Nook Designs #newtonsnook #handmade

To create this scene she used the images of gifts and the  cute kitty popping out from the gift from the Newton's Christmas Cuddles Stamp Set. She colored the piles of gifts in fun bright colors and also added in some fun clouds to the sky using the Cloudy Sky Stencil and added on the "celebrate" from the new Birthday Essentials Stamp Set. The little stitched purple flag was cut out using our Frames & Flags Die Set.

Next, you open those two flaps to reveal this next scene:

Interactive Folding Birthday Card with Ellen Haxelmans | Newton Loves Cake Stamps and dies by Newton's Nook Designs #newtonsnook #handmade

So cute! For this scene Ellen used the kitty with the cake from the from the Newton Loves Cake Stamp Set and add a cute little coke bottle for him from the Love Bites Stamp Set. She created a hill using the Land Borders Die Set and also added in a cute little chick from the Newton's Easter Basket Stamp Set. In the sky behind the kitty she added pawprints using our Pawprint Stencil. She also added the "make a wish" sentiment from the new Birthday Essentials Stamp Set.

Then you can fold open those two flaps to reveal the final message and inside of the card:


Interactive Folding Birthday Card with Ellen Haxelmans | Newton's Birthday Balloons Stamps and dies by Newton's Nook Designs #newtonsnook #handmade

Wow! What fun! On this last scene Ellen used the kitty with balloons from the Newton's Birthday Balloons Stamp Set. She added some clouds along the bottom using our Sky Borders Die Set and added confetti to the sky with the Confetti Stencil! She also added in the "Happy Birthday" from the new Birthday Essentials Stamp Set. She even added in a cute little birthday hat from the Newton Loves Cake Stamp Set.

This is so fun, don't you think!? It makes opening the card such a fun journey with a scene at each step! Are you inspired to try to make a fun card like this for someone special? Make sure you share it with us if you do! We'd love to see it!

If you love this project by Ellen you can visit her over at her blog Crafty Ellen to see more of her beautiful creations!


Thursday, March 22, 2018

Reach for the Stars Slider Card by Samantha Mann

Reach for the Stars Slider Card by Samantha Mann | Cosmic Newton Stamp Set by Newton's Nook Designs #newtonsnook #handmade

Reach for the Stars!!

Today we are sharing a fun and inspirational card by Samantha! For her card today she used that fun image of Newton in a space rocket from our Cosmic Newton Stamp Set. She colored the rocked in fabulous rainbow colors and added it to her card with a slider behind him so you can slide him up into the sky! How cool is that!? That fun black background was created using a paintbrush and some black gesso and then she added a bunch of the smaller stars and a planet, also from the Cosmic Newton Stamp Set. She cut out all the pieces using the coordinating Cosmic Newton Die Set. to finish off her card she added the "reach for the stars" sentiment embossed in white on a black flag and some rainbow washi tape up the right side. So fun! This card would be great to send to a graduate or just for fun to inspire someone to do their best!

Thank you Samantha for the inspirational card today! To say hello to Samantha and see more of her awesome creations, you can visit Samantha's Blog, Sam's Scrap Candy!


Wednesday, March 21, 2018

Easter Treat Bag by Juliana Michaels

Easter Treat Bag by Juliana Michaels | Newton's Easter Basket Stamp Set and Frames & Flags Die Set by Newton's Nook Designs #newtonsnook #handmade

Happy Easter Treat! 

Today we have an adorable little great bag created by Juliana! She created this adorable treat holding using our Frames & Flags Die set. Make sure to check over on her blog today for a tutorial on how she created it. To decorate her bag she used that cute image of the kitty hiding behind the easter eggs from our  Newton's Easter Basket Stamp Set. She used such fin bright colors to color all those pretty eggs! Then she trimmed it out with the coordinating Newton's Easter Basket Die Set to add to the front of her treat holder. She also added a little grassy edge to the bottom using our Land Borders Die Set and added some soft clouds to the sky using our Cloudy Sky Stencil! So sweet and pretty!

To see more details on her project today, make sure to visit  Juliana over on her blog, 17 Turtles!


Tuesday, March 20, 2018

Big Wishes Card by Maria Russell

Big Wishes Card by Maria Russell | Holding Happiness and Newton's Birthday Balloons Stamp Sets by Newton's Nook Designs #newtonsnook #handmade

Big Wishes!!

Today we have an adorable card to share created by Maria!  She started out with that cute kitty from our NEW Newton's Birthday Balloons Stamp Set. She colored that kitty with cute little stripes and gave him some colorful balloons and a gift. She also added on such sweet little details on the balloons and kitty cheeks with a white gel pen. The she trimmed hi out with the coordinating  Newton's Birthday Balloons Die Set to add onto her card. For her card base she used a piece of paper cut out from our Sky Borders Die Set as a mask and layered pretty clouds through the background.  She added on the fun "Big Wishes" and "because you're worth it" sentiments from our new Holding Happiness Stamp Set over the clouds. Then she layered a fun die cut panel over that (from another company) and layered that cute kitty on the top! She also added on a fun little white bow detail using the bow from our Pines & Holly Die Set. So pretty!

Big Wishes Card by Maria Russell | Holding Happiness and Newton's Birthday Balloons Stamp Sets by Newton's Nook Designs #newtonsnook #handmade

To see more beautiful projects by Maria, visit her over at her blog, Maria Russell Designs and don't forget to subscribe to her YouTube channel too!


Monday, March 19, 2018

So Hoppy Together Card by March Guest Designer Mindy Eggen


Welcome everyone! So excited to be back  guest designing today over on the blog for Newton's Nook Designs and I have some more adorable Bitty Bunnies to share! I combined quite a few of their amazing products into one card! 

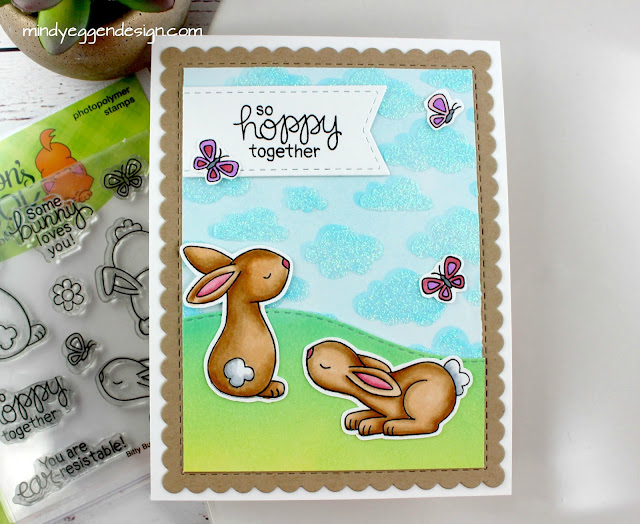
I started out with my background. I used a piece of Bristol Smooth cardstock and lightly applied some Tumbled Glass Distress Ink all around. Then I used the Cloudy Sky Stencil and attached that to my distressed panel. I applied Mermaid Lagoon LIGHTLY so I just had a hint of clouds on my blue sky. Then, I removed the stencil and slightly shifted it over a smidge so it was offset. I adhered it back down to my panel and came in with Tonic Nuvo Moonstone Glimmer Paste this time. I love this sparkly offset look! 

So Hoppy Together Bunny Card by March Guest Designer Mindy Eggen | Bitty Bunnies Stamp Set by Newton's Nook Designs #newtonsnook

While my background is drying, I took another piece of Bristol Smooth cardstock and applied Twisted Citron, Cracked Pistachio and Lucky Clover distress oxide ink. Then I die cut that with the stitched hill from the Land Borders Die Set

So Hoppy Together Bunny Card by March Guest Designer Mindy Eggen | Bitty Bunnies Stamp Set by Newton's Nook Designs #newtonsnook

My sweet little bunnies are stamped onto Neenah white cardstock 80lb with copic friendly ink then colored with copic markers. I die cut them out with the coordinating die along with some pretty little butterflies. I also die cut a banner from the Frames and Flags die set and stamped the sentiment in black ink. I trimmed off one end of the banner so it would be flush with the edge of my card once I put it together. 

So Hoppy Together Bunny Card by March Guest Designer Mindy Eggen | Bitty Bunnies Stamp Set by Newton's Nook Designs #newtonsnook


I'm going to be using a 4 1/4" x 5 1/2" white cardbase and add a frame from the Frames & Flags die set that I cut from Kraft cardstock. Next, after my clouds were dry which didn't take long, I trimmed this piece and the hillside piece down to 3 1/2" to fit inside the frame. I made sure to leave room to show the stitching because I love this look.  I finished off the card by adding my bunnies, butterflies and sentiments using double sided tape to make sure it holds good against the stenciled background. 

I hope you enjoyed today's card. I adore all these products and they are so versatile so be sure to head over to Newton's Nook Designs to check them out. It is so fun playing with their products and so thrilled to be with them this month! 
 - Mindy 

Copics Used
Bunnies - E34-33-31-30
Tails - C3-2-1
Ears - R85-81
Butterflies - V04-R85


You can visit Mindy over at her blog, Mindy Eggen Design and check out her videos on her YouTube Channel!

Friday, March 16, 2018

March Products now Available + Blog Hop Winners

Are you ready to get your paws inky with our new stamps?

Winners from the blog hop are posted below - scroll down to see if you won

Our new products are now available at newtonsnookdesigns.com


March Blog Hop Winners!

Thank you to everyone for participating in our blog hop. We really enjoy reading all of your comments! Check out below to see if you won! The blogs and the comments were chosen using random.org.

Winner of the Holding Happiness stamp set from Jennifer's blog: Lisa Petrella


Winner of the Uplifting Wishes stamp set from Amanda Bodine's blog: Melissa Watson

Winner of the Newton's Birthday Balloons stamp set from Larissa's blog: Sandie Herron

Winner of the Birthday Essentials stamp set from Juliana's blog: Brandi R

Congrats to the Winners! Don't forget - you have 5 days from today to to e-mail us at info@newtonsnookdesigns.com with your full name and mailing address to claim your prize. Also please include the name of the set you won!

You can shop online now - our new release is up in the store!


Thursday, March 15, 2018

March Reveals - Day 4 - Birthday Essentials

Newton's Nook Designs | March 2018 Release
Today is our Final reveal day for our March Release and we have one final birthday set to share. Today's set is called Birthday Essentials and you are going to LOVE how it completes our birthday theme! We have a giveaway too so make sure you read all the way to the bottom of this post to see how to win!

Birthday cards by Jennifer Jackson | Birthday Essentials Sentiment Stamp Set and Confetti and Bubbly Stencils by Newton's Nook Designs #newtonsnook #handmade

Birthday Essentials Stamp Set

Create marvelous birthday greetings with this 4 x 6 stamp set! This set will become indispensable for adding messages to birthday cards! It includes beautiful birthday themed words and sentiments in various sizes and styles so you will find the perfect message to add to any card! The two longer greetings are perfect for putting on the inside of the card too!
| Birthday Essentials Stamp Set by Newton's Nook Designs #newtonsnook #handmade

Here's some info on the Birthday Essentials stamp set:
  • 4 x 6 photopolymer stamp set 
  • 11 word and sentiment stamps
  • Available for purchase in our online shop starting Friday, March 16th

Check out the Birthday fun with amazing cards by our Design Team today!

Check out all the awesome projects below from our Design Team below! Then, make sure to click through to all their blogs for details on their cards - you will find a few extra cards on some of the DT blogs and you might even find a fun video or two along the way! Make sure to comment on all the blogs for a chance to win! Details on the giveaway are at the bottom of today's post.

Celebrate card by Larissa Heskett | Birthday Essentials Sentiment Stamp Set by Newton's Nook Designs #newtonsnook #handmade
Celebrate! Larissa created this amazing rainbow card, embossing the word "celebrate" from the  Birthday Essentials Stamp Set in rainbow colors of glitter! So pretty! She also used our Frames & Flags Die Set for the black scallop edged frame and stitched rectangle.
Floral Birthday card by Maria Russell | Lovely Blooms and Birthday Essentials Sentiment Stamp Set by Newton's Nook Designs #newtonsnook #handmade
Maria created this gorgeous birthday card using the "Happy Birthday" Sentiment from the new Birthday Essentials Stamp Set along with some pretty flowers from our Lovely Blooms Stamp Set! What a great combo of images! 
Celebrate card by Amanda Bodinel | Holding Happiness and Birthday Essentials Sentiment Stamp Sets by Newton's Nook Designs #newtonsnook #handmade
Amanda created this amazing birthday card! She created a fun "celebrate" background by stamping the word from the Birthday Essentials Stamp Set in different colors. Then she layered the fun image of the lady holding balloons over the top! She finished the card off with the "It's your day" sentiment, also from the new Birthday Essentials Stamp Set.

Cue the Confetti card by Samantha Mann | Birthday Essentials Sentiment Stamp Set by Newton's Nook Designs #newtonsnook #handmade
Samantha created a fun stripe filled with words from the Birthday Essentials Stamp Set and inked over it with lovely pink, red and yellow distress inks! So gorgeous! She then finished off her card with the "cue the confetti" sentiment, embossed in black!

Balloon Shaker card by Tatiana Trafimovich | Birthday Essentials Sentiment Stamp Set and Balloon Shaker Die Set by Newton's Nook Designs #newtonsnook #handmade
This adorable shaker card was created by Tatiana! She cut the balloon out using the new Balloon Shaker die and layered it over the fun word background. For the background she used several of the words and sentiments from the Birthday Essentials Stamp Set. She also cut out the stitched rectangle using our Frames & Flags Die Set

Birthday card by Juliana Michaels | Birthday Essentials Sentiment Stamp Set and Confetti Stencil by Newton's Nook Designs #newtonsnook #handmade
Juliana created this fun birthday card with a shiny foiled background of confetti. To create the background she used our new Confetti Stencil along with different colors of foil. Then she layered the Happy Birthday Sentiment over the top using the new Birthday Essentials Stamp Set. 

Celebrate card by Jennifer Timko | Birthday Essentials Sentiment Stamp Set by Newton's Nook Designs #newtonsnook #handmade
Jennifer created this lovely card using the "celebrate" from Birthday Essentials Stamp Set as the focal point of her card. She stamped it onto the stitched banner cut out using the Frames & Flags Die Set. Behind the sentiment she created a fun watercolored panel using gorgeous blues! This simple card would be perfect for any celebration! 

Birthday card by Ellen Haxelmans | Holding Happiness and Birthday Essentials Sentiment Stamp Sets by Newton's Nook Designs #newtonsnook #handmade
Ellen created this beautiful birthday card! She inked up a panel using bright colors of distress ink. Then she embossed the sentiments from the Birthday Essentials Stamp Set on top using white embossing powder. She also added in that cute balloon image from our new Holding Happiness Stamp Set (revealed here on Monday). The pink, purple and blue balloons really pop off the card! 

Birthday card by Naki Rager | Holding Happiness and Birthday Essentials Sentiment Stamp Sets by Newton's Nook Designs #newtonsnook #handmade
This fun birthday card was created by Naki. She stamped the lady holding a gift from our new Holding Happiness Stamp Set (revealed here on Monday). Then she added in the "Happy Birthday" from the new Birthday Essentials Stamp Set in gold. She embellished it with some confetti pieces cut out using the new Balloon Shaker Die Set! She also used our Frames & Flags Die Set to create the big scallop edged panel. 
Balloon card by Holly Endress | Birthday Essentials Sentiment Stamp Set and Balloon Shaker Die Set by Newton's Nook Designs #newtonsnook #handmade
Holly created this adorable balloon card. She created a cloudy background and added on two balloons die cut out using our  new Balloon Shaker Die Set. She layered on the "make a wish" sentiment from the Birthday Essentials Stamp Set, stamping it on a stitched white banner that was cut out using our Frames & Flags Die Set

Would you like to win the “Birthday Essentials” Stamp Set?
This set will be given away to ONE lucky winner! 


Here's how to win: Comment on the NND blog and Design Team blogs (see list below)! The winner will be chosen at random from the collective reveal posts. Make sure to check out each of their blogs and comment for your chance to win. You will not know which blog has been chosen so the more you comment on the better your chances are of winning! You have until Thursday March 15th at 9pm EST to comment  -- winners will be announced on the blog post on Friday, March 16th.