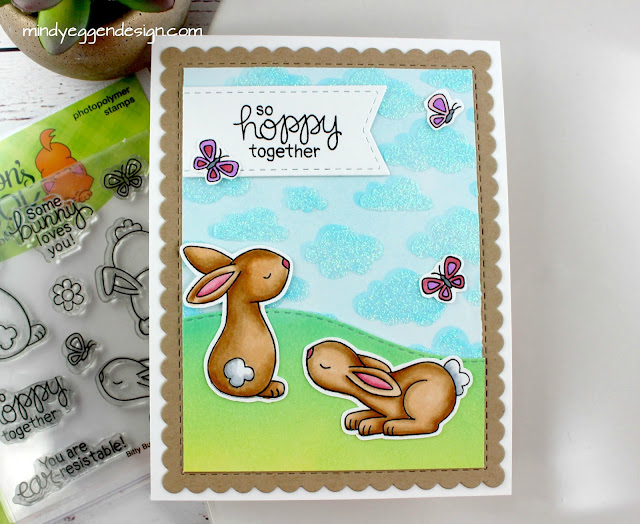
Welcome everyone! So excited to be back guest designing today over on the blog for Newton's Nook Designs and I have some more adorable Bitty Bunnies to share! I combined quite a few of their amazing products into one card!
I started out with my background. I used a piece of Bristol Smooth cardstock and lightly applied some Tumbled Glass Distress Ink all around. Then I used the Cloudy Sky Stencil and attached that to my distressed panel. I applied Mermaid Lagoon LIGHTLY so I just had a hint of clouds on my blue sky. Then, I removed the stencil and slightly shifted it over a smidge so it was offset. I adhered it back down to my panel and came in with Tonic Nuvo Moonstone Glimmer Paste this time. I love this sparkly offset look!
While my background is drying, I took another piece of Bristol Smooth cardstock and applied Twisted Citron, Cracked Pistachio and Lucky Clover distress oxide ink. Then I die cut that with the stitched hill from the Land Borders Die Set.
My sweet little bunnies are stamped onto Neenah white cardstock 80lb with copic friendly ink then colored with copic markers. I die cut them out with the coordinating die along with some pretty little butterflies. I also die cut a banner from the Frames and Flags die set and stamped the sentiment in black ink. I trimmed off one end of the banner so it would be flush with the edge of my card once I put it together.
I'm going to be using a 4 1/4" x 5 1/2" white cardbase and add a frame from the Frames & Flags die set that I cut from Kraft cardstock. Next, after my clouds were dry which didn't take long, I trimmed this piece and the hillside piece down to 3 1/2" to fit inside the frame. I made sure to leave room to show the stitching because I love this look. I finished off the card by adding my bunnies, butterflies and sentiments using double sided tape to make sure it holds good against the stenciled background.
I hope you enjoyed today's card. I adore all these products and they are so versatile so be sure to head over to Newton's Nook Designs to check them out. It is so fun playing with their products and so thrilled to be with them this month!
- Mindy
- Mindy
Copics Used
Bunnies - E34-33-31-30
Tails - C3-2-1
Ears - R85-81
Butterflies - V04-R85
You can visit Mindy over at her blog, Mindy Eggen Design and check out her videos on her YouTube Channel!


Very cute! Love your card and these bunnies are so adorable! One of my fav spring sets!
ReplyDeleteso adorable card!
ReplyDelete